

Introduction
This article is an overview of
Angular Application Structure and Fundamentals, for starters, to help you understand how different building blocks work together. Part 1, can be found here.
Let’s get started.
Angular 8 Application Structure
Angular is a single
page framework and platform to develop scalable applications. An angular
application is built on top of Node.js and written in TypeScript.
An Angular
application is a tree of components, in which the Top level component is the
application itself. It is compiled by node and rendered by the browser itself, when
bootstrapping the application.
NgModules,
Components, Views, and Services are the basic building blocks of an angular
application.
The Below Diagram, from angular guide, shows how different pieces are linked together.
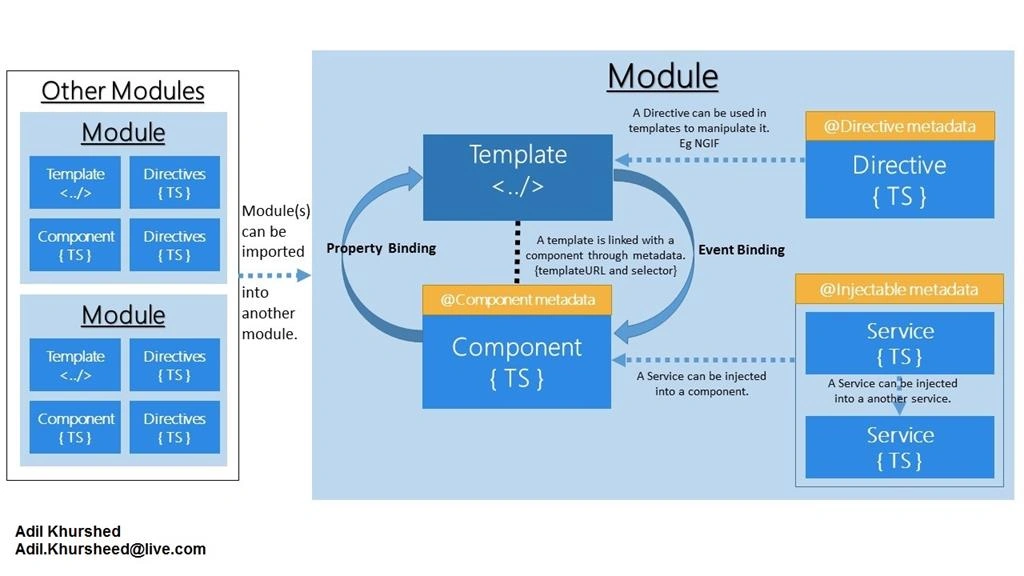
Let’s discuss
each of them in detail.
Module
A collection
of NgModules forms an angular application having at least one NgModule, which is
the root Module conventionally called AppModule. @NgModule(…) decorator is used
to decorate a TypeScript class into a Module. Decorators are the functions that
add extra information to a TS Class, so that the angular knows what a class is
for and how it should work.
A basic
Module has a list of Components as declarations, imports other modules and
exports itself, to be used by other modules.
- import { BrowserModule } from '@angular/platform-browser';
- import { NgModule } from '@angular/core';
- import { AppComponent } from './app.component';
- @NgModule({
- declarations: [
- AppComponent
- ],
- imports: [
- BrowserModule
- ],
- providers: [],
- bootstrap: [AppComponent]
- })
- export class AppModule { }
To add a new
module you can run ng command
“ng g m
{ModuleName}” it will generate the new module in app folder, you can specify a
different path, for example “ng g m modules/{ModuleName}” will generate the new
module in app/modules folder.
You can also
provide additional attribute like “-- routing”
For example
“ng g m {ModuleName} --routing” which will also generate routing module with
the new module.
We can
multiple module to implement separation of concern. For example, a side having admin
functionality should have a different module having all the admin site
functionality. We’ll further look into creating new modules in upcoming
articles.
Component
A Component
is a functional code block as a typescript class decorated with @Component(…) decorator having some
metadata which defines a template.
To add a
component you can run the ng command below.
“ng g c
{ComponentName}” it will generate a new component in the default app folder.
“ng g c {path}/{ComponentName}”
you can specify any subfolder to generate in the component. For example, ”ng g c
components/MyNewComponent” command will generate the new component in
“app/components” folder.
Below, is a
very basic component, in which @component decorator is imported from
“@angular/core”. It has two required properties, selector and
template/templateUrl If a component has very simple page content, then “template”
can be used, rather than an HTML file, referenced using templateUrl.
- import { Component } from '@angular/core';
- @Component({
- selector: 'app-root',
- templateUrl: './app.component.html', // template:`<h1>Simple page Content</h1>`
- styleUrls: ['./app.component.scss']
- })
- export class AppComponent {
- }
Next, let’s
populate this component by adding few properties and method that will then be
used in the template binding.
- import { Component } from '@angular/core';
- @Component({
- selector: 'app-root',
- templateUrl: './app.component.html', // template:`<h1>Simple page Content</h1>`,
- styleUrls: ['./app.component.scss']
- })
- export class AppComponent {
- title = 'MyFirstAngular8App';
- backgroundColor = "silver";
- model: any = { username:"adil", firstName:"", lastName:"" }
- Submit() {
- console.log('Submited:', this.model);
- /// do something
- }
- }
Template
Templates are
the UI elements of the application, which are defined by the Components. To add
extra functionality in a plain HTML file, Angular Templates provide different
types of binding below.
One-way Binding
Interpolation: Allows you to evaluate
an expression and result of the expression is rendered as string.
- <span>{{ title }} app is running!</span>
Property Binding: Allows you to inject
values from app (eg: component) to html, for example injecting a dynamic background
color of a div.
- <div [style.background-color]="backgroundColor"></div>
Or
Setting value
of an input element as a one way binding, specially used for the ready only
field.
- <input type="text" [(value)]="model.username" name="username" readonly>
Event Binding: Allows the app (eg:
component) to respond to a user input, for example button click.
- <button (click)="buttonClick()">click me</button>
Two Way
Binding
ngModel: ngModel as banana in a bracket
“[()]” allows you to send and receive a specific value to html from app and
vice versa. For example UserName field in html form.
- <div [style.background-color]="backgroundColor">
- <span>{{ title }} app is running!</span> <!-- interplation -->
- <br>
- <p> Model json: {{model | json}} <!-- interplation with pipe -->
- </p>
- <span>User Name(readonly)</span>
- <!-- one way binding-->
- <input type="text" [value]="model.username" name="username" readonly>
- <br>
- <span>First Name</span>
- <!-- one way binding-->
- <input type="text" [(ngModel)]="model.firstName" name="firstName">
- <br>
- <!-- one way binding-->
- <span>Last Name</span>
- <input type="text" [(ngModel)]="model.lastName" name="lastName">
- <br>
- <button (click)="Submit()">Click me</button>
- </div>
You are
always encouraged to look into the official documentation of angular for more
information https://angular.io/guide/template-syntax.
Service (injectable)
If the data or functionality is not view specific, then it can be moved into a service. A Service
provides extra functionality that can be injected into Components through
dependency injection. We can also inject a service in other services. For example, code block for getting/posting form data from/to a Web API, can be moved
to a separate TS class, decorate it as injectable and inject it into a
component.
It is
decorated with @Injectable() decorator from @angular/core.
To add a new
service you can run the command below.
“ng g s {ServiceName}” this
command will generate a new service in app folder.
You can add service in a
different folder, by specifying the path with the service name. For example, “ng g s
services/dataservice” will generate dataservice in app/services folder.
- import { Injectable } from '@angular/core';
- @Injectable({
- providedIn: 'root'
- })
- export class DataService {
- constructor() { }
- }
Let’s add a simple method
“getDefaultObject” which returns an object
And “logObject”
which accepts an object and logs it.
- import { Injectable } from '@angular/core';
- @Injectable({
- providedIn: 'root'
- })
- export class DataService {
- constructor() { }
- getDefaultObject(): any {
- return { username: "adil.khurshed", firstName: "adil", lastName: "khurshed" };
- }
- logObject(obj: any) {
- console.log('Submited:', obj);
- }
- }
Now, our service is ready, so
let’s inject it in AppComponent and do some code refactor, to use the service to
get the object and log the object when submitted. To inject a service, we can
simple inject in the constructor, as shown below.
- import { DataService } from './data.service';
- import { Component } from '@angular/core';
- @Component({
- selector: 'app-root',
- templateUrl: './app.component.html',
- styleUrls: ['./app.component.scss']
- })
- export class AppComponent {
- title = 'MyFirstAngular8App';
- backgroundColor = "silver";
- model: any = {};
- dataServiceObj: DataService;
- // injected our service into our component constructor
- constructor(dataService: DataService) {
- this.dataServiceObj = dataService;
- // get the model object from our service
- this.model = this.dataServiceObj.getDefaultObject();
- }
- Submit() {
- //logged our model using service method
- this.dataServiceObj.logObject(this.model);
- }
- }
Conclusion
In this article we have
discussed building blocks of an angular application and created each block with
a basic example.
In the next article, we’ll
discuss Angular Routing in detail, having multiple modules and we will develop a
complex application architecture, with routing.
Git Repository of this article can be found here.
Sohail ArshedPosted Oct 11, 2019, 3:18 PM
Very Informative :)