
Here, I am going to explain how to run an ASP.NET Core application with the help of Docker.
Prerequisites
- Microsoft Visual Studio professional 2017.
- Docker community edition 18.03.1
- Windows 10 Enterprise 64-bit operating system.
I have accomplished this task with the help of this software.
Create ASP.NET CORE application
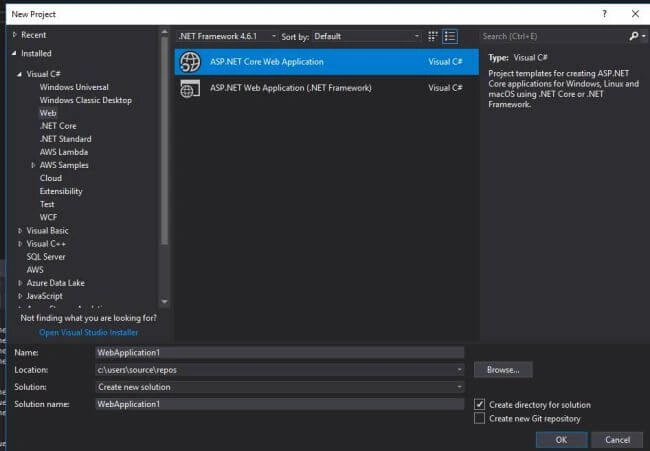
Open VS2017, then go to File->New->Project->Select ASP.NET Core web application and click on OK button, as shown in the below image.
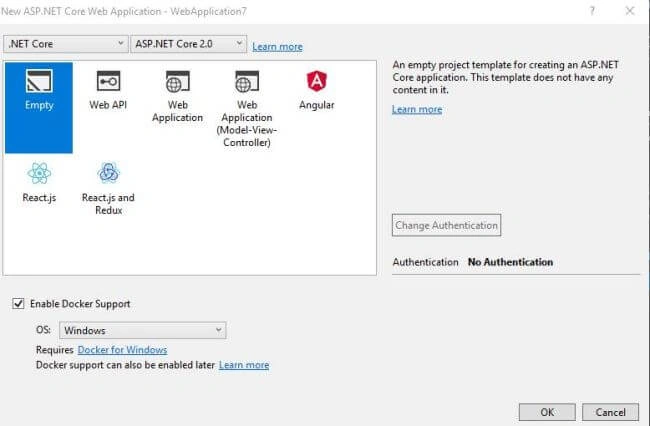
As soon as you select OK button, it will display the below screen. Select Empty Template and check the Enable Docker support checkbox as well as select OS as Windows and click on the OK button, as shown in the below image.
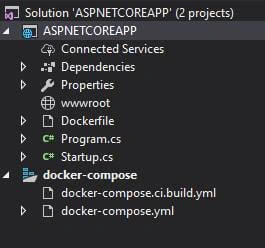
As soon as we click on the ok button we will get to see some Dockerfile, Program.cs, and Starup.cs files under Solution Explorer. All of these files get added automatically.
So far we have created the application with the help of VS 2017. Now we can see the actual beauty of Docker. Generally, after creating an application in Visual Studio, the next step is to build the app and run it.
Docker is not like that. If you observe in solution explorer, we have Dockerfile where things will happen.
Let’s look into the contents of Dockerfile.
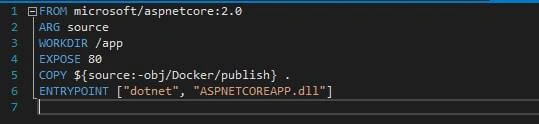
First Line FROM Microsoft/aspnetcore:2.0 is the base image for this application in order to run the dot net core application.
ARG source is the argument which helps to pass data to the image.
WORKDIR /app is the working directory of the image; it will store all DLLs inside the app folder.
COPY will copy the DLLs of the application to the root directory (here dot represents root) of the image.
ENTRYPOINT is responsible to run the main application with the help of ASPNETCOREAPP.dll.
Before running the application we have to build and call the publish command.
Open the command prompt & go to project folder where you have created the project. In my case path is c:/users/projects/ASPNETCOREAPP/
Once you are in the specified path execute the below command:
dotnet publish --configuration Release --output ./obj/Docker/publish
Once you are done, you can observe inside obj/Docker folder, the publish folder gets created. This publish folder has all DLLs of your project.
Now once again go to command prompt and try to build an image for your application with the help of Docker.
- Before building the image make sure you have to switch to Windows container; only then can you build images on Docker because while creating dot net core application we have chosen Docker to support OS as Windows.
- Go to your project folder where Dockerfile exists in command prompt and call the below command
docker build -t myapp:latest . - Here build is docker command to create images
- -t is the tag (name) of the application
- Here image name is myapp:latest
- . (dot) represents current directory where Dockerfile exists.
- After building the image, you have to run the image with the help of the below command
docker run -p 5000:5000 myapp:latest - Where run is the docker command to run image
- -p is the port assigned to the application
- Myapp:latest is the image name
- Once you run it you can check whether the container is running or not with the help of the below command.
docker ps –a it will display the list of running containers.
- Basically, Windows container will run on a specific IP address. To get the IP address of running container we have to execute the below command.
docker inspect -f '{{range.NetworkSettings.Networks}}{{.IPAddress}}{{end}}' cb015e972100(Container ID) - It will return the IP address; in my case, it is running on this IP 172.20.23.110
- Just go to the browser and call it like below.

Karthik ChintalaPosted Aug 29, 2018, 12:11 AM
Good one Pawan.
Tridip BhattacharjeePosted May 31, 2018, 6:37 AM
What is the file extension of docker image file ? what runtime need be there in pc to run docker image file?
Tridip BhattacharjeePosted May 29, 2018, 3:34 AM
Thanks a lot for this subject. docker. please write series on docker for windows and linux.
Tridip BhattacharjeePosted May 28, 2018, 9:19 AM
You said - All dependencies we copy into container with help of COPY command. is there any way to make all the dependency copied into container automatically when we build docker image from VS IDE instead of copying things manually?
Tridip BhattacharjeePosted May 28, 2018, 9:17 AM
Thanks for the answer. we often developed db driven app and you said All dependencies we copy into container. if we use sql server then sql server runtime environment with full db schema and data will be copied into container or not?
Tridip BhattacharjeePosted May 28, 2018, 8:21 AM
Why should anyone use windows container because we can run the exe from folder or we can host web application in iis. so tell me the advantage of using container.
Former memberPosted May 28, 2018, 5:18 AM
Generally we need to create different container for different OS,If you want run it on multiple container(windows & Linux) we need LCOW support.
Former memberPosted May 28, 2018, 5:14 AM
As per article I built image is based on windows.So It will run on windows container.
Tridip BhattacharjeePosted May 28, 2018, 4:25 AM
After building the docker image docker build -t myapp:latest . how to run the same container in windows and linux ? same container will work for any OS or we need to create different different container for different OS?
Tridip BhattacharjeePosted May 28, 2018, 4:24 AM
Good article. please keep posting various things on docker.