

Introduction
This article will demonstrate how to implement ASP.NET WEB API CRUD logics using Entity Framework without writing code and how to work with Postman to validate Web API services.
This article will demonstrate how to implement ASP.NET WEB API CRUD logics using Entity Framework without writing code and how to work with Postman to validate Web API services.
Prerequisites
- Visual Studio
- SQL Management Studio
- Basics of C#
- Basics of SQL Server
- Basics of ASP.NET WEB API
- Basics of Entity Framework
Article Flow
- Create Table in SQL Server
- Create ASP.NET WEB API Empty Project
- Install Entity Framework from NuGet
- Implement "Database First" approach with Entity Framework
- Implement WEB PAI scaffolding with Entity Framework
- HTTP Error 403.14 - Forbidden
- Enabling Cross-Origin Requests in ASP.NET Web API 2
- Validate Services using Postman
Create Table in SQL Server
First, we will create a table in SQL Server to implement the CRUD logic in ASP.NET WEB API. I have designed the below table.
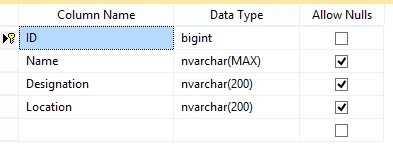
Execute the below query to create a table with the above design.
- CREATE TABLE [dbo].[Employee](
- [ID] [bigint] IDENTITY(1,1) NOT NULL,
- [Name] [nvarchar](max) NULL,
- [Designation] [nvarchar](200) NULL,
- [Location] [nvarchar](200) NULL,
- CONSTRAINT [PK_Employee] PRIMARY KEY CLUSTERED
- (
- [ID] ASC
- ))
- GO
And, insert a few dummy records to view in Postmen. For that, execute the below query.
- GO
- SET IDENTITY_INSERT [dbo].[Employee] ON
- GO
- INSERT [dbo].[Employee] ([ID], [Name], [Designation], [Location]) VALUES (1, N'Gnanavel Sekar', N'Software Engineer', N'Chennai')
- GO
- INSERT [dbo].[Employee] ([ID], [Name], [Designation], [Location]) VALUES (3, N'Robert', N'Application Developer', N'Chennai')
- GO
- INSERT [dbo].[Employee] ([ID], [Name], [Designation], [Location]) VALUES (4, N'Ramar', N'TechLead', N'Chennai')
- GO
- INSERT [dbo].[Employee] ([ID], [Name], [Designation], [Location]) VALUES (10002, N'Subash', N'Software Engineer', N'Coimbatore')
- GO
- INSERT [dbo].[Employee] ([ID], [Name], [Designation], [Location]) VALUES (10003, N'Gokul', N'Team Lead', N'USA')
- GO
- INSERT [dbo].[Employee] ([ID], [Name], [Designation], [Location]) VALUES (10004, N'Karthi', N'Sr. Software Engineer', N'Coimbatore')
- GO
- INSERT [dbo].[Employee] ([ID], [Name], [Designation], [Location]) VALUES (10005, N'Sharma', N'Software Engineer', N'Banglore')
- GO
- INSERT [dbo].[Employee] ([ID], [Name], [Designation], [Location]) VALUES (10006, N'Ammaiyappan', N'Software Developer', N'Chennai')
- GO
- INSERT [dbo].[Employee] ([ID], [Name], [Designation], [Location]) VALUES (10007, N'Manoj', N'Sr.Software Engineer', N'Chennai')
- GO
- INSERT [dbo].[Employee] ([ID], [Name], [Designation], [Location]) VALUES (10008, N'Mr.Blue', N'Sr.Software Engineer', N'Coimbatore')
- GO
- SET IDENTITY_INSERT [dbo].[Employee] OFF
- GO
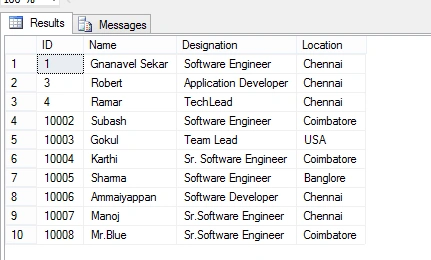
Once you execute the above query, you will get the employee record as below.
Create ASP.NET WEB API Empty Project
To create ASP.NET WEB API empty project, follow the below steps one by one. Here, I have used Visual Studio 2013.
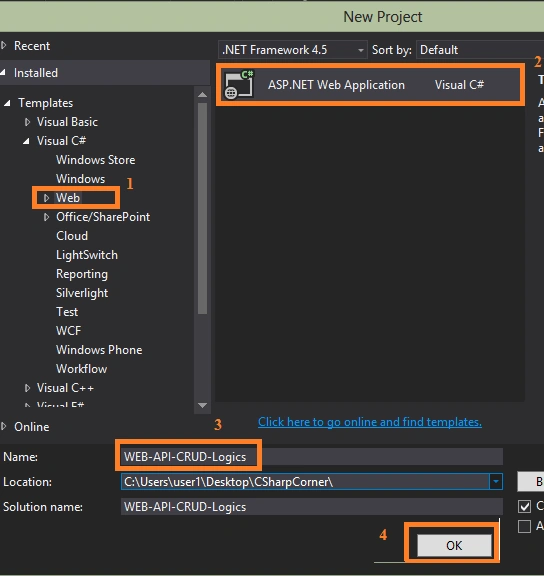
Step 1 Select Language and Name Your Project
Select New Project -> Visual C# -> Web -> ASP.NET Web Application and enter your application name. Here, I named it "WEB-API-CRUD-Logics". Now, click OK.
Step 2
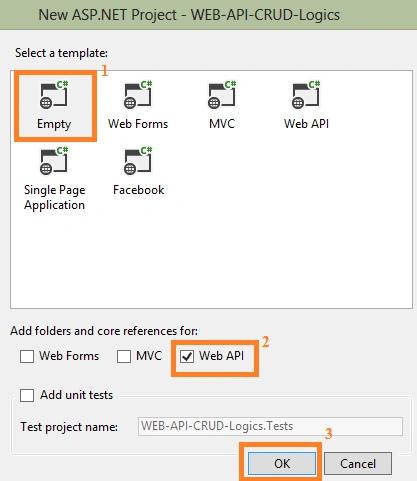
Select Empty Web API template and click OK to create the project.
Step 3
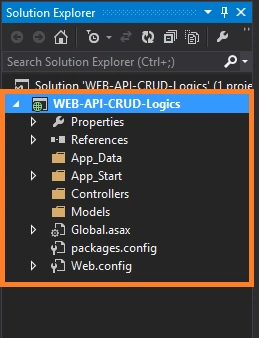
Once you click OK, the project will be created with the basic architecture of ASP.NET WEB API
Install Entity Framework From NuGet
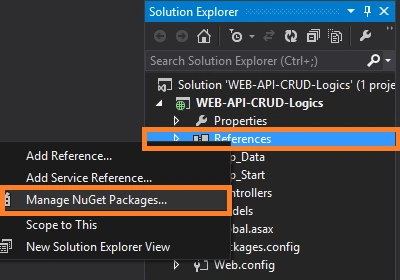
To install Entity Framework from NuGet, right click on References and select Manage NuGet Packages.
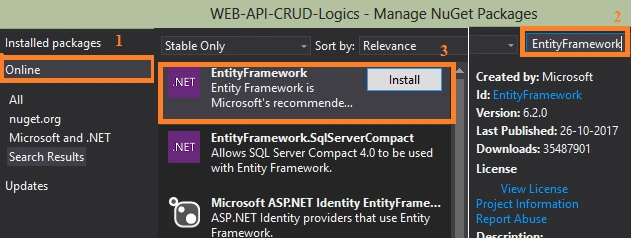
And now, search EntityFramework online to install and add the reference to your project.
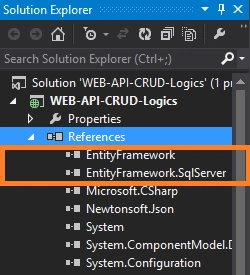
After installing the EntityFramework from NuGet, it will be added as a reference to our project.
Implement Database First Approach with Entity Framework
Before implementing the database first approach, we should know what the database first approach is.
Database First Approach
It creates model codes such as classes, properties, and DbContext etc. from the database in the project and all classes become the links between the database and Controller. It always deals with the existing database. Now, we will move to the steps to implement the database first approach.
Step1
Here, I am going to create the .edmx file under the model's folder. So, right click on Models folder and select Add->ADO.NET Entity Data
model
Step 2
Step 2
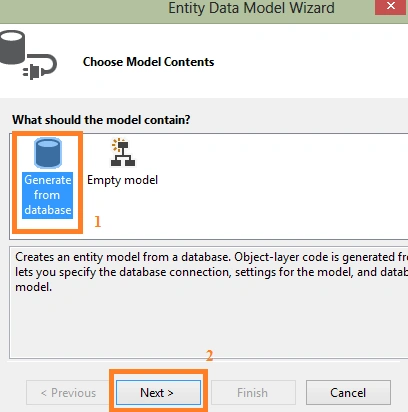
Select Data->ADO.NET Entity Data Model-> name your edmx file (here, I mentioned as CRUDLogics.edmx), and click Add.
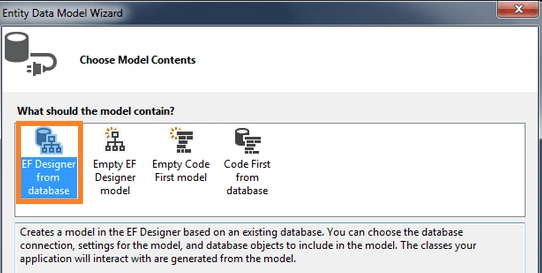
If you are working with a higher version than Visual Studio 2013, follow the below screen.
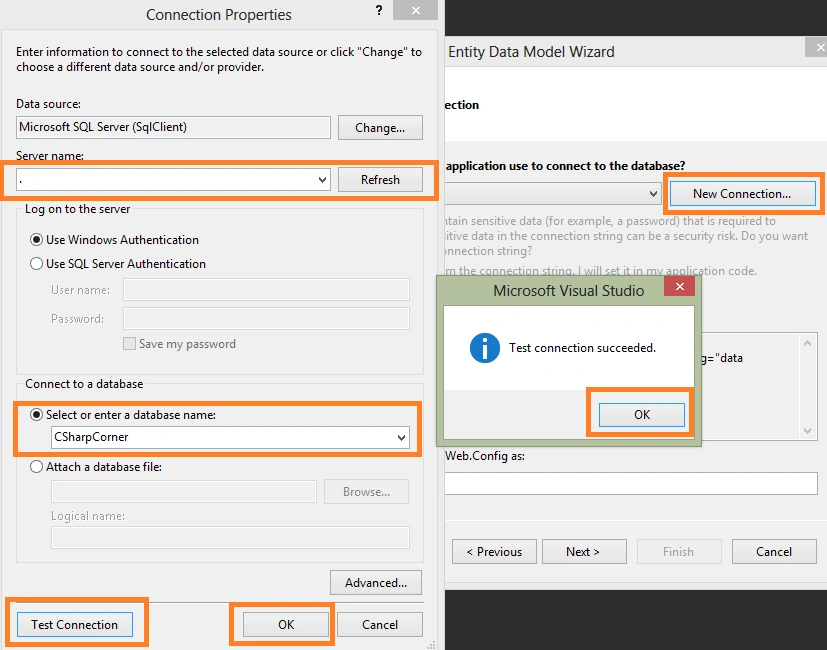
Step 4 Configure the connection to SQL server
To create a connection, click New Connection and select Microsoft SQL Server ->Continue.
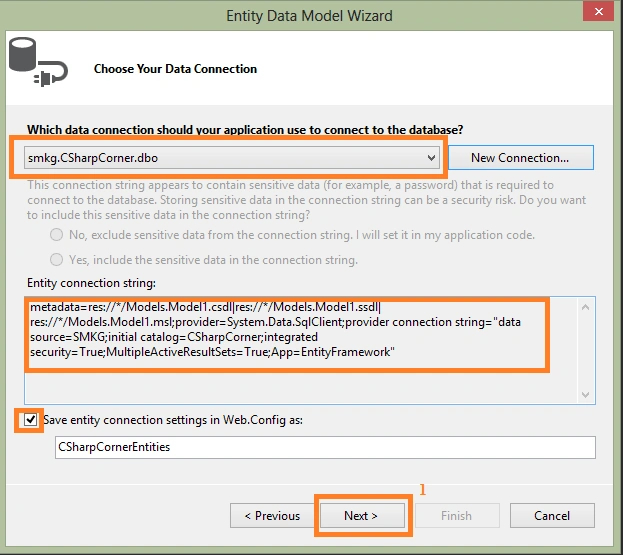
Step 6
In the below image, you can see that the connection was successfully created.
Step 7
Now, select the table(s) which are needed to be configured with our application through Entity Framework and click Finish.
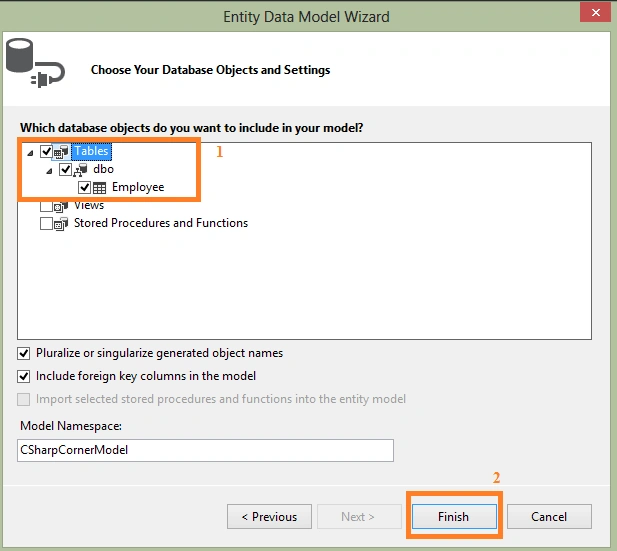
Step 8
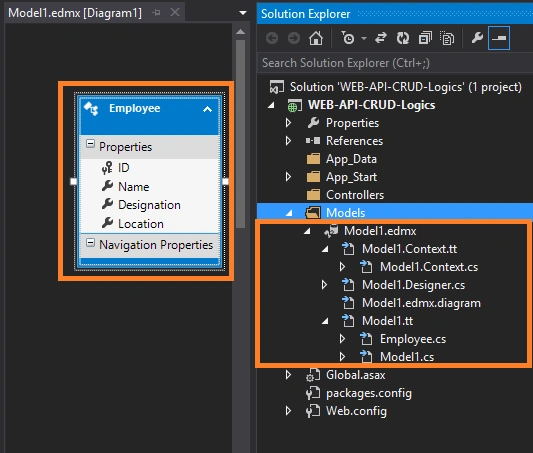
Now, you can see in the below image that the EntityModels are configured with Classes, Properties, DataContext and etc. If you have more than one table, you can easily see the tables with relationships in a .exmx diagram. Here, we have one table only, so there is no possibility to see that.
Implement WEB API scaffolding with Entity Framework
What is Scaffolding?
This option is enabled from Visual Studio 2013 for MVC and Web-API. Scaffolding generates the code automatically for CRUD operations, here we will use the WEB API scaffolding with Entity Framework to create Dynamic code for doing create, read, update, and delete. We will see one by one of the following steps for better understanding.
Step 1 Create Controller
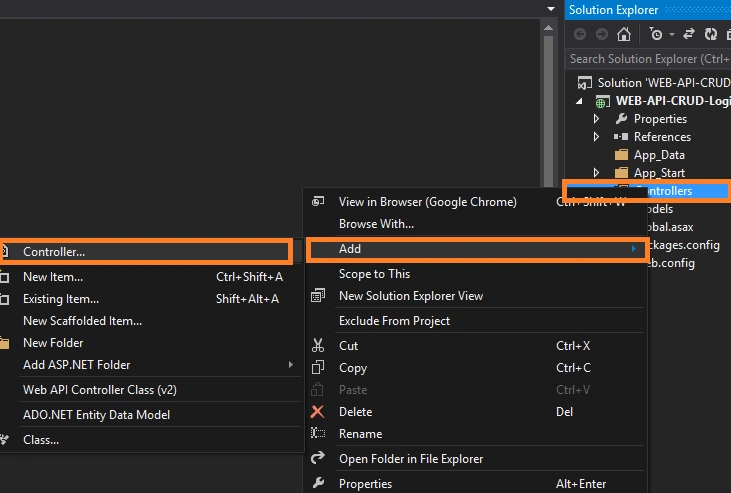
Right click on Controllers folder under your project-> select Add-> Controller
Step 2
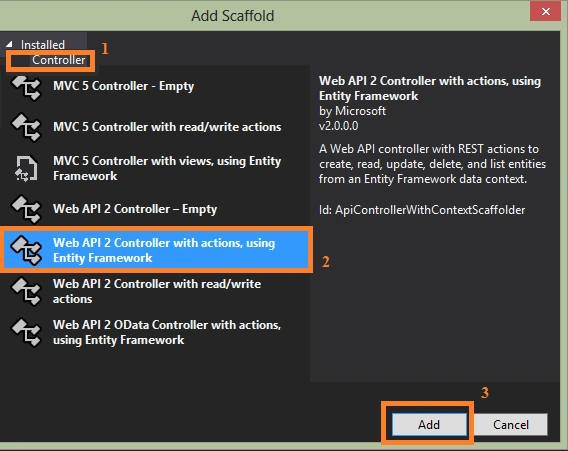
To implement scaffolding Select "Web API 2 Controller with actions, using Entity Framework" and click add
Step 3
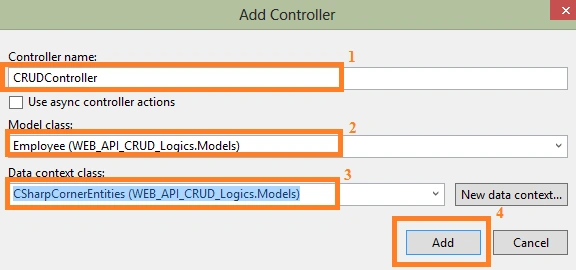
Name the Controller->Select the Models->Select Data context->and click add
You will fall into the below error if you did not rebuild your project after completion database first approach,
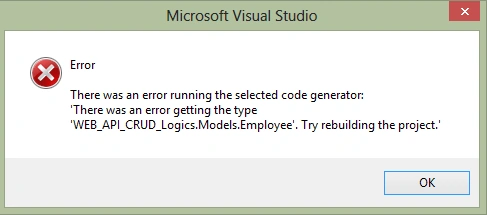
So now rebuilding the project and repeat the steps of creating controller and scaffolding.
After completion of step 3 by clicking the Add button, it will start the Scaffolding process

Step 4
In the below image you can see that CRUDController is created with Get, Put, Post, Delete, Dispose and IsExists Action method with Logics.
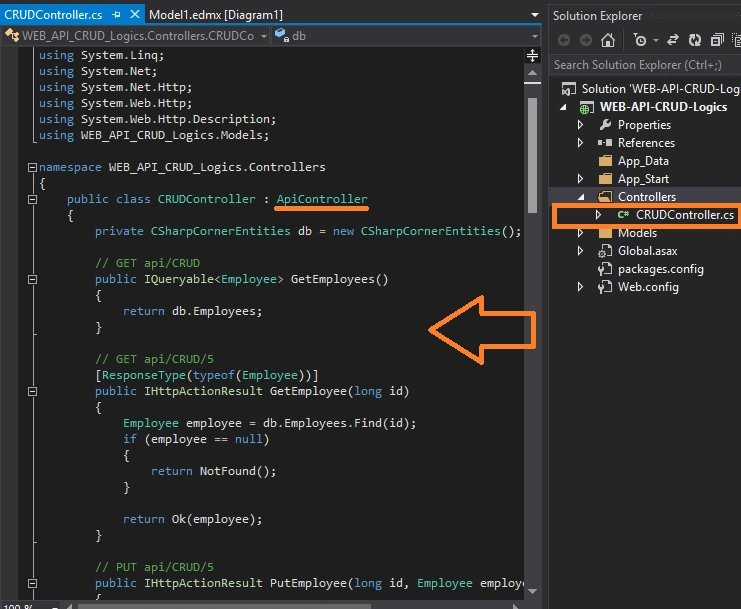
Generated Codes
- using System;
- using System.Collections.Generic;
- using System.Data;
- using System.Data.Entity;
- using System.Data.Entity.Infrastructure;
- using System.Linq;
- using System.Net;
- using System.Net.Http;
- using System.Web.Http;
- using System.Web.Http.Description;
- using WEB_API_CRUD_Logics.Models;
- namespace WEB_API_CRUD_Logics.Controllers {
- public class CRUDController: ApiController {
- private CSharpCornerEntities db = new CSharpCornerEntities();
- // GET api/CRUD
- public IQueryable < Employee > GetEmployees() {
- return db.Employees;
- }
- // GET api/CRUD/5
- [ResponseType(typeof(Employee))]
- public IHttpActionResult GetEmployee(long id) {
- Employee employee = db.Employees.Find(id);
- if (employee == null) {
- return NotFound();
- }
- return Ok(employee);
- }
- // PUT api/CRUD/5
- public IHttpActionResult PutEmployee(long id, Employee employee) {
- if (!ModelState.IsValid) {
- return BadRequest(ModelState);
- }
- if (id != employee.ID) {
- return BadRequest();
- }
- db.Entry(employee).State = EntityState.Modified;
- try {
- db.SaveChanges();
- } catch (DbUpdateConcurrencyException) {
- if (!EmployeeExists(id)) {
- return NotFound();
- } else {
- throw;
- }
- }
- return StatusCode(HttpStatusCode.NoContent);
- }
- // POST api/CRUD
- [ResponseType(typeof(Employee))]
- public IHttpActionResult PostEmployee(Employee employee) {
- if (!ModelState.IsValid) {
- return BadRequest(ModelState);
- }
- db.Employees.Add(employee);
- db.SaveChanges();
- return CreatedAtRoute("DefaultApi", new {
- id = employee.ID
- }, employee);
- }
- // DELETE api/CRUD/5
- [ResponseType(typeof(Employee))]
- public IHttpActionResult DeleteEmployee(long id) {
- Employee employee = db.Employees.Find(id);
- if (employee == null) {
- return NotFound();
- }
- db.Employees.Remove(employee);
- db.SaveChanges();
- return Ok(employee);
- }
- protected override void Dispose(bool disposing) {
- if (disposing) {
- db.Dispose();
- }
- base.Dispose(disposing);
- }
- private bool EmployeeExists(long id) {
- return db.Employees.Count(e => e.ID == id) > 0;
- }
- }
- }
Now Rebuild and Run your application, we might get the below error if we did not enable directory browse in IIS or in our application
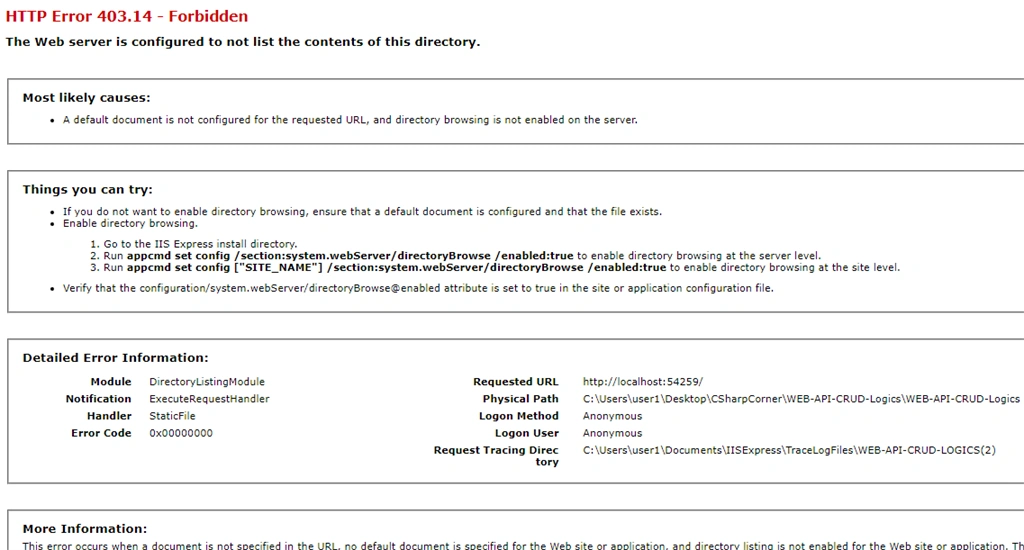
HTTP Error 403.14 - Forbidden
We can overcome this HTTP Error 403.14- Forbidden in two ways
- Enable directoryBrowse in WebCofing system.webServer
- Enable in IIS
Enable directoryBrowse in WebCofing system.webServer
Goto your Web API project->Open the WebConfig file and add the below code
Goto your Web API project->Open the WebConfig file and add the below code
- <system.webServer>
- <directoryBrowse enabled="true" />
- </system.webServer>
Now Run your application, you will get the below error if you are using the Web API template first time or Visual Studio 2013
Could not load file or assembly 'System.Web.Http, Version=5.0.0.0, Culture=neutral, PublicKeyToken=31bf3856ad364e35' or one of its dependencies. The located assembly's manifest definition does not match the assembly reference. (Exception from HRESULT: 0x80131040)
To overcome this issue update or install below dll from NuGet package
To overcome this issue update or install below dll from NuGet package
- Microsoft.AspNet.WebApi
Enabling Cross-Origin Requests in ASP.NET Web API 2
Cross-Origin Resource Sharing (CORS) is a W3C standard that allows a server to relax the same-origin policy. Using CORS, a server can explicitly allow some cross-origin requests while rejecting others. CORS is safer and more flexible than earlier techniques such as JSONP
- Install below dll from NuGet package
- Microsoft.AspNet.WebApi.Cors
And add below code to your WebApiConfig.cs file
- config.EnableCors(new EnableCorsAttribute("*", "*", "GET,PUT,POST,DELETE"));
Complete code of WebApiConfig.cs
- using System;
- using System.Collections.Generic;
- using System.Linq;
- using System.Web.Http;
- using System.Web.Http.Cors;
- namespace WEB_API_CRUD_Logics {
- public static class WebApiConfig {
- public static void Register(HttpConfiguration config) {
- // Web API configuration and services
- // Web API routes
- config.MapHttpAttributeRoutes();
- config.Routes.MapHttpRoute(name: "DefaultApi", routeTemplate: "api/{controller}/{id}", defaults: new {
- id = RouteParameter.Optional
- });
- config.EnableCors(new EnableCorsAttribute("*", "*", "GET,PUT,POST,DELETE"));
- }
- }
- }
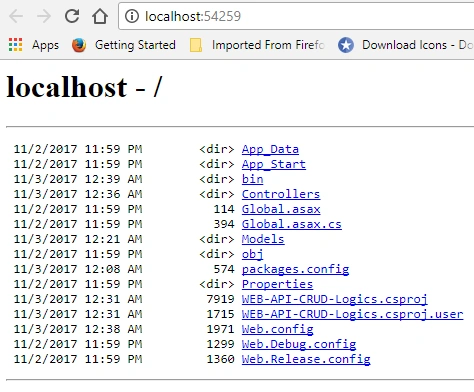
Now run your application, Yes! We got the successful services. We will validate all actions(CRUD) using postman
Attribute Routing
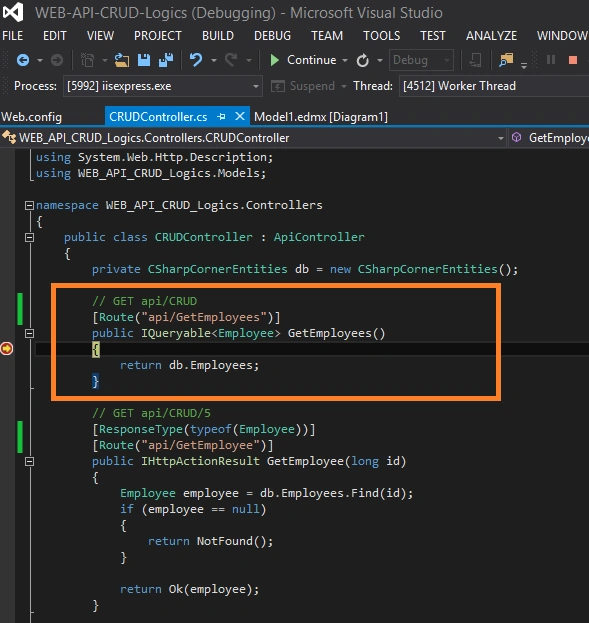
Attribute routing can be thought of as convention based routing. It means the developer can change the route's default pattern to a custom way. Attribute routing is used on the top of an action, controller name in WebAPI and MVC. Here we will see the action based attribute routing. In the below code, you can see that I have created attribute routing on top of the action.
Attribute routing can be thought of as convention based routing. It means the developer can change the route's default pattern to a custom way. Attribute routing is used on the top of an action, controller name in WebAPI and MVC. Here we will see the action based attribute routing. In the below code, you can see that I have created attribute routing on top of the action.
Example [Route("api/GetEmployees")] to get all employees.
- using System;
- using System.Collections.Generic;
- using System.Data;
- using System.Data.Entity;
- using System.Data.Entity.Infrastructure;
- using System.Linq;
- using System.Net;
- using System.Net.Http;
- using System.Web.Http;
- using System.Web.Http.Description;
- using WEB_API_CRUD_Logics.Models;
- namespace WEB_API_CRUD_Logics.Controllers {
- public class CRUDController: ApiController {
- private CSharpCornerEntities db = new CSharpCornerEntities();
- // GET api/CRUD
- [ResponseType(typeof(IEnumerable < Employee > ))]
- [Route("api/GetEmployees")]
- public IQueryable < Employee > GetEmployees() {
- return db.Employees;
- }
- // GET api/CRUD/5
- [ResponseType(typeof(Employee))]
- [Route("api/GetEmployee")]
- public IHttpActionResult GetEmployee(long id) {
- Employee employee = db.Employees.Find(id);
- if (employee == null) {
- return NotFound();
- }
- return Ok(employee);
- }
- // PUT api/CRUD/5
- [Route("api/PutEmployee")]
- public IHttpActionResult PutEmployee(long id, Employee employee) {
- if (!ModelState.IsValid) {
- return BadRequest(ModelState);
- }
- if (id != employee.ID) {
- return BadRequest();
- }
- db.Entry(employee).State = EntityState.Modified;
- try {
- db.SaveChanges();
- } catch (DbUpdateConcurrencyException) {
- if (!EmployeeExists(id)) {
- return NotFound();
- } else {
- throw;
- }
- }
- return StatusCode(HttpStatusCode.NoContent);
- }
- // POST api/CRUD
- [Route("api/PostEmployee")]
- [ResponseType(typeof(Employee))]
- public IHttpActionResult PostEmployee(Employee employee) {
- if (!ModelState.IsValid) {
- return BadRequest(ModelState);
- }
- db.Employees.Add(employee);
- db.SaveChanges();
- return CreatedAtRoute("DefaultApi", new {
- id = employee.ID
- }, employee);
- }
- // DELETE api/CRUD/5
- [Route("api/DeleteEmployee")]
- [ResponseType(typeof(Employee))]
- public IHttpActionResult DeleteEmployee(long id) {
- Employee employee = db.Employees.Find(id);
- if (employee == null) {
- return NotFound();
- }
- db.Employees.Remove(employee);
- db.SaveChanges();
- return Ok(employee);
- }
- protected override void Dispose(bool disposing) {
- if (disposing) {
- db.Dispose();
- }
- base.Dispose(disposing);
- }
- [Route("api/EmployeeExists")]
- private bool EmployeeExists(long id) {
- return db.Employees.Count(e => e.ID == id) > 0;
- }
- }
- }
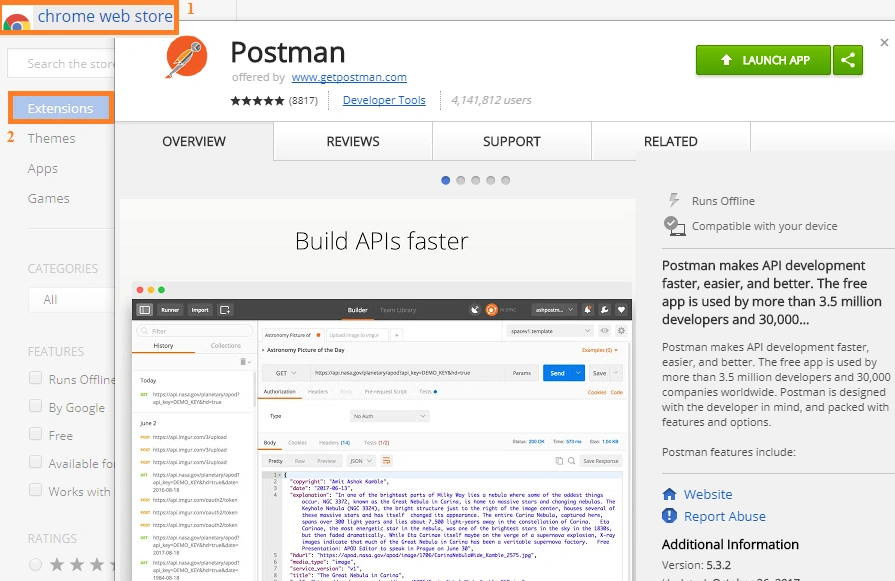
After successful installation, open it and select HTTP Method and enter the URL of your Web API as shown below.
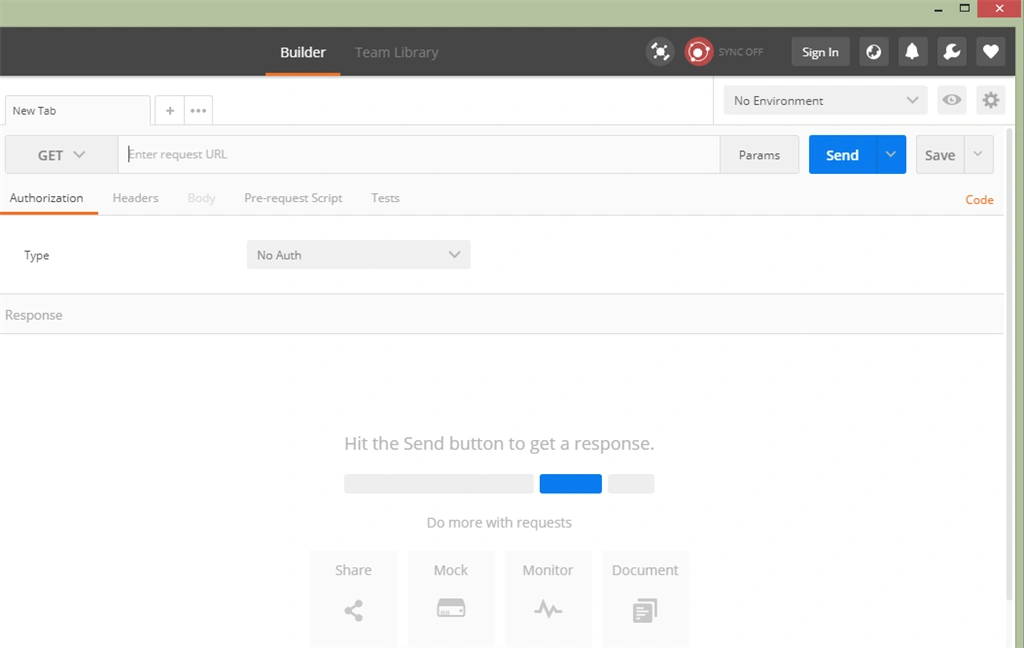
API URL: http://localhost:54259/
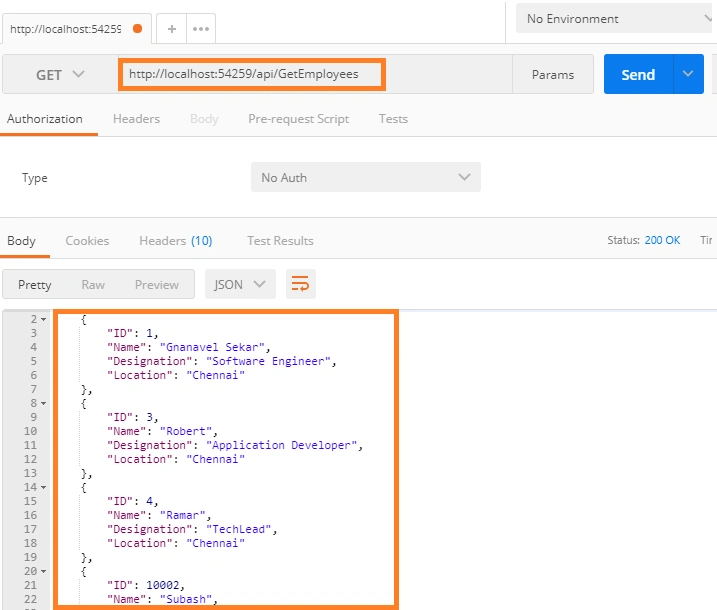
Get Employee List Routing: api/GetEmployees
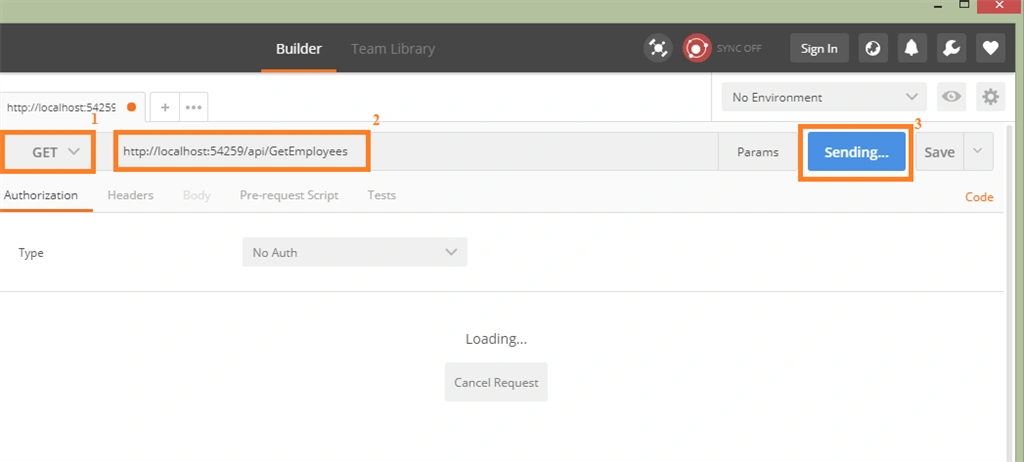
After Clicked the send button it will make a request to server
And the Result will be
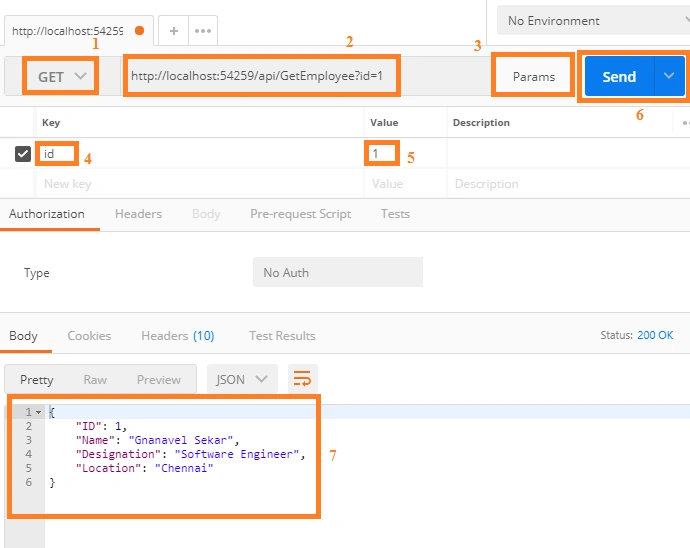
Now we will see how to pass the parameter, for that we will use the api/GetEmployee.
Yeah! we successfully made a WEB API services for CRUD operation. Now the client application can perform the CRUD operation by calling these APIs. In another article, I discussed how to make a standard form of services, the easiest way to make documentation and validate the API using Swagger can be found Here.
Summary
In this article, you learned to implement CRUD services in ASP.NET WEB API using Entity Framework without writing code and how to use the Postman and also validate the API Services.
I hope it's helpful, your valuable feedback and comments about this article are always welcome.
Pintukumar ShashmalPosted Mar 5, 2021, 10:23 AM
Hi Sekar , when i am deleted Action , getting Errors,
Jeffri Alfa RazaqPosted Jun 23, 2019, 11:08 AM
Hi sekar, i try to POST this data with raw JSON(application/json). i get error response "Message": "An error has occurred.",ExceptionMessage": "Validation failed for one or more entities. See 'EntityValidationErrors' property for more details.", "ExceptionType": "System.Data.Entity.Validation.DbEntityValidationException". I'm Using VS Community 2019 & Postman
Kevin HallPosted May 20, 2019, 9:05 AM
First article that I have been able to use that actually works.. This is amazing. Thank you.
Janani JanagiramanPosted May 2, 2019, 5:23 AM
Such an awesome post. Thanks a lot man!
shyam prasadPosted Oct 22, 2018, 2:11 AM
Hi Sekar, Any idea on below error please when adding controller "There was an error running the selected code generator: 'Error loading type library/DLL. (exception from HRESULT: 0x80029C4A (TYPE_E_CANTLOADLIBRARY))'" as suggested over the internet i tried many things but didnt work for me I'm using VS community 2015
Balasubramanian RPosted Aug 29, 2018, 6:36 PM
Is it prefered to async controller over normal controller
sunitha bonthaPosted Aug 18, 2018, 1:22 AM
I am not able to update. is i need to do any changes in "PUT" code...??
Srivatsa ChakravarthyPosted Mar 27, 2018, 5:32 AM
I'm getting error while I try to use POST method. The exception message is "ExceptionMessage": "UrlHelper.Link must not return null."
Udit GargPosted Feb 28, 2018, 7:52 AM
How can I make isActive Column as false when a delete option is hit in the frontend for employee database. I am using Entity framework and Automapper in the web api. Also I have separate Employee and EmployeeDto classes . Can somebody help?
arpith palankarPosted Feb 23, 2018, 9:37 AM
Thank you for the beautiful post.
Isaías ToledoPosted Feb 8, 2018, 1:25 PM
Segu? todos tus pasos, pero cuando quiero hacer un POST lanza esta excepci?n: System.ArgumentNullException HResult=0x80004003 Mensaje = Value cannot be null. Parameter name: entity Origen = EntityFramework Seguimiento de la pila: en System.Data.Entity.Utilities.Check.NotNull[T](T value, String parameterName) en System.Data.Entity.DbSet`1.Add(TEntity entity) en UsuarioService.Controllers.UsuariosController.PostUsuarios(Usuarios usuarios) en C:\Users\operador\source\repos\TestUsuariosNuevo\UsuarioService\Controllers\UsuariosController.cs: l?nea 87 en System.Web.Http.Controllers.ReflectedHttpActionDescriptor.ActionExecutor.<>c__DisplayClass10.<GetExecutor>b__9(Object instance, Object[] methodParameters) en System.Web.Http.Controllers.ReflectedHttpActionDescriptor.ActionExecutor.Execute(Object instance, Object[] arguments) en System.Web.Http.Controllers.ReflectedHttpActionDescriptor.ExecuteAsync(HttpControllerContext controllerContext, IDictionary`2 arguments, CancellationToken cancellationToken)
Humayun Kabir MamunPosted Nov 4, 2017, 10:00 AM
Thanks Gnanavel Sekar fro this nice article...
Karthick KumarPosted Nov 4, 2017, 4:31 AM
Nice Article sir, thanks for sharing...