

This example shows, how to create a very simple registration form in ASP.NET WebForms, using the traditional ADO.NET. Here’s, the glimpse of the page output: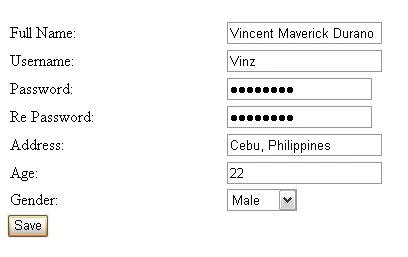
Creating the Database
The following are the basic steps on how to create a simple database in SQL Server:
- Launch SQL Server Management Studio Express and then connect.
- Expand Databases folder from SQL Server object Explorer.
- Right click Databases folder and select “New Database”.
- From the pop-up Window, input the database name, which you would like and then click add.
- Expand Database folder, which you have just added.
- Right click on the Tables folder and select “New Table”.
- Add the following fields, given below:
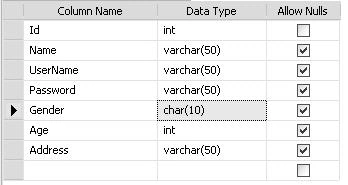
Note: In this demo, we will set the Id to auto increment, so that the Id will be automatically generated for every new added row. To do this, select the Column name “Id” and in the column properties, set the “Identity Specification” to yes.
After adding all the necessary fields, name your database table to whatever you like. For this particular demo, we will just name it as “tblRegistration”.
Setting up the UI
For the simplicity of this demo, we will set up UI like: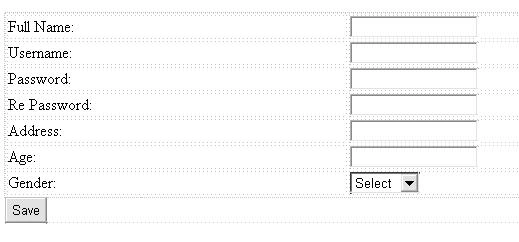
Here’s, the equivalent ASPX Markup:
- <html xmlns="http://www.w3.org/1999/xhtml">
- <head runat="server">
- <title>Sample Registration Page</title>
- <style type="text/css">
- .style1 {
- width: 100%;
- }
- </style>
- </head>
- <body>
- <form id="form1" runat="server">
- <div>
- <table class="style1">
- <tr>
- <td>Full Name:</td>
- <td>
- <asp:TextBox ID="TxtName" runat="server"></asp:TextBox>
- </td>
- </tr>
- <tr>
- <td>Username:</td>
- <td>
- <asp:TextBox ID="TxtUserName" runat="server"></asp:TextBox>
- </td>
- </tr>
- <tr>
- <td>Password:</td>
- <td>
- <asp:TextBox ID="TxtPassword" runat="server"
- TextMode="Password"></asp:TextBox>
- </td>
- </tr>
- <tr>
- <td>Re Password:</td>
- <td>
- <asp:TextBox ID="TxtRePassword" runat="server"
- TextMode="Password"></asp:TextBox>
- </td>
- </tr>
- <tr>
- <td>Address:</td>
- <td>
- <asp:TextBox ID="TxtAddress" runat="server"></asp:TextBox>
- </td>
- </tr>
- <tr>
- <td>Age:</td>
- <td>
- <asp:TextBox ID="TxtAge" runat="server"></asp:TextBox>
- </td>
- </tr>
- <tr>
- <td>Gender:</td>
- <td>
- <asp:DropDownList ID="DropDownList1" runat="server"
- AppendDataBoundItems="true">
- <asp:ListItem Value="-1">Select</asp:ListItem>
- <asp:ListItem>Male</asp:ListItem>
- <asp:ListItem>Female</asp:ListItem>
- </asp:DropDownList>
- </td>
- </tr>
- </table>
- </div>
- <asp:Button ID="Button1" runat="server" Text="Save"
- onclick="Button1_Click" />
- </form>
- </body>
- </html>
Setting up the ConnectionString
Now, open the web.config file and configure the connection string, as shown below:
- <connectionStrings>
- <add name="DBConnectionString" connectionString="Data Source=YourDatabaseServerName;
- Initial Catalog=YourDatabase;
- Integrated Security=SSPI;"
- providerName="System.Data.SqlClient" />
- </connectionStrings>
The Member Class
Now, let’s create a new class, which would hold the following properties:
- public class Member{
- public string Name { get; set; }
- public string UserName { get; set; }
- public string Password { get; set; }
- public string Gender { get; set; }
- public string Age { get; set; }
- public string Address { get; set; }
- }
Switch to your code behind the file and add the following method to get the connection string:
- public string GetConnectionString()
- {
- return ConfigurationManager.ConnectionStrings["DBConnectionString"].ConnectionString;
- }
ADO.NET Tutorial
Here’s, the code block to insert the data to the database:
- private void ExecuteInsert(Member member) {
- using (SqlConnection sqlConn = new SqlConnection(GetConnectionString()))
- {
- string sql = @"INSERT INTO tblRegistration
- (Name, UserName, Password, Gender, Age, Address)
- VALUES
- (@Name,@UserName,@Password,@Gender,@Age,@Address)";
- using (SqlCommand sqlCmd = new SqlCommand(sql, sqlConn))
- {
- sqlCmd.Parameters.AddWithValue("@Name", member.Name);
- sqlCmd.Parameters.AddWithValue("@UserName", member.UserName);
- sqlCmd.Parameters.AddWithValue("@Password", member.Password);
- sqlCmd.Parameters.AddWithValue("@Gender", member.Gender);
- sqlCmd.Parameters.AddWithValue("@Age", member.Age);
- sqlCmd.Parameters.AddWithValue("@Address", member.Address);
- sqlConn.Open();
- sqlCmd.CommandType = CommandType.Text;
- sqlCmd.ExecuteNonQuery();
- }
- }
- }
Now, let’s call the method, shown above, at button’s click event like:
- protected void Button1_Click(object sender, EventArgs e) {
- if (TxtPassword.Text == TxtRePassword.Text)
- {
- //fill the class properties with form values
- Member member = new Member();
- member.Name = TxtName.Text;
- member.UserName = TxtUserName.Text;
- member.Password = TxtPassword.Text;
- member.Gender = DropDownList1.SelectedItem.Text;
- member.Age = TxtAge.Text;
- member.Address = TxtAddress.Text;
- //call the method to execute insert to the database
- ExecuteInsert(member);
- Response.Write("Record was successfully added!");
- ClearControls(Page);
- }
- else
- {
- Response.Write("Password did not match");
- TxtPassword.Focus();
- }
- }
- private static void ClearControls(Control Parent)
- if (Parent is TextBox)
- { (Parent as TextBox).Text = string.Empty; }
- else
- {
- foreach (Control c in Parent.Controls)
- ClearControls(c);
- }
- }
RajaPosted Aug 27, 2016, 7:27 AM
Nice article..
Bhavik PatelPosted Aug 25, 2016, 6:14 PM
Nice
Vignesh ManiPosted Aug 25, 2016, 6:32 AM
Good one
Ramesh PalaniappanPosted Aug 25, 2016, 2:28 AM
Good one