

Introduction
Bot Service provides an integrated environment that is purpose-built for bot development, enabling you to build, connect, test, deploy, and manage intelligent bots, all from one place. Bot Service leverages the Bot Builder SDK with support for .NET and Node.js. You can write a bot, connect, test, deploy, and manage it from your web browser with no separate editor or source control required.
For simple bots, you may not need to write code at all. Bot Service accelerates bot development with five bot templates you can choose from when you create a bot. You can further modify your bot directly in the browser using the Azure editor or in an Integrated Development Environment (IDE), such as Visual Studio and Visual Studio Code
Here are some key features of Bot Service,
- Multiple language support
- Bot Service leverages Bot Builder with support for .NET and Node.js.
- Bot Service leverages Bot Builder with support for .NET and Node.js.
- Bot templates
- Bot Service templates allow you to quickly create a bot with the code and features you need. Choose from a Basic bot, a Forms bot for collecting user input, a Language understanding bot that leverages LUIS to understand user intent, a QnA bot to handle FAQs, or a Proactive bot that alerts users of events.
- Bot Service templates allow you to quickly create a bot with the code and features you need. Choose from a Basic bot, a Forms bot for collecting user input, a Language understanding bot that leverages LUIS to understand user intent, a QnA bot to handle FAQs, or a Proactive bot that alerts users of events.
- Bring your own dependencies
- Bots support NuGet and NPM, so you can use your favorite packages in your bot.
- Bots support NuGet and NPM, so you can use your favorite packages in your bot.
- Flexible development
- Code your bot right in the Azure portal or set up continuous integration and deploy your bot through GitHub, Visual Studio Team Services, and other supported development tools. You can also publish from Visual Studio.
- Code your bot right in the Azure portal or set up continuous integration and deploy your bot through GitHub, Visual Studio Team Services, and other supported development tools. You can also publish from Visual Studio.
- Connect to channels
- Bot Service supports several popular channels for connecting your bots and the people that use them. Users can start conversations with your bot on any channel that you've configured your bot to work with, including Skype, Facebook, Teams, Slack, SMS, and several others.
- Bot Service supports several popular channels for connecting your bots and the people that use them. Users can start conversations with your bot on any channel that you've configured your bot to work with, including Skype, Facebook, Teams, Slack, SMS, and several others.
- Tools and services
- Test your bot with the Bot Framework Emulator and preview your bot on different channels with the Channel Inspector.
- Test your bot with the Bot Framework Emulator and preview your bot on different channels with the Channel Inspector.
- Open source
- The Bot Builder SDK is open-source and available on GitHub
In this post, I will show how to create Azure bot that is integrated with Entity Framework to retrieve the employee vacation balance from Azure SQL database.
Prerequisites
- Visual Studio 2017.
- In Visual Studio, update all extensions to their latest versions.
- Bot template for C#.
Create Chat Bot
First, you'll need to download and install the Bot template, to download click on the following URL: https://marketplace.visualstudio.com/items?itemName=BotBuilder.BotBuilderV3
After the download completes, double-click on BotBuilderVSIX.vsix and install it.
Then, you'll need to download and install the emulator. Open the following URL https://emulator.botframework.com/ to download the emulator. After the download completes, launch the executable and complete the installation process.
Now, open Visual Studio, select Bot framework, change the name, and click OK.
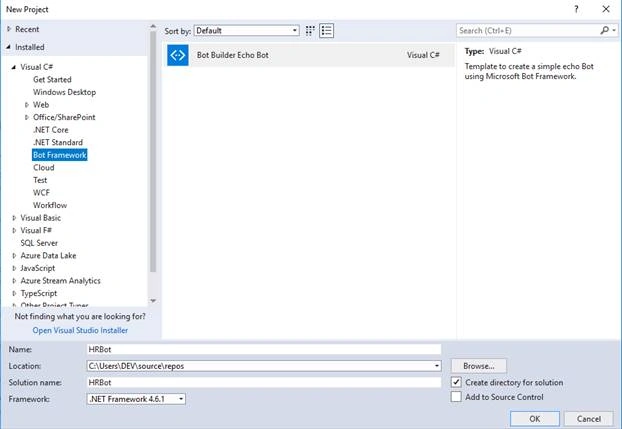
Now, we need to create Employee Order form to collect the employee select service. To do that create a new class named EmployeeOrder.cs and replace the original class code with the following one.
- public enum ServiceType
- {
- GetVacationBalance,
- LeaveRequest
- }
- [Serializable]
- public class EmployeeOrder
- {
- [Describe(Description = "Service", Image = "")]
- [Prompt("Please select the service you want. {||}")]
- public ServiceType? Service { get; set; }
- public static IForm<EmployeeOrder> BuildForm()
- {
- //PromptAttribute
- return new FormBuilder<EmployeeOrder>()
- .Field(nameof(Service))
- .Confirm("No verification will be shown", state => false)
- .Build();
- }
- }
Next, we need to create a Vacation Form by creating Vacation.cs class.
- [Serializable]
- public class Vacation
- {
- [Describe(Description = "Employee ID")]
- [Numeric(1, 100000)]
- [Prompt("Please give me your employee identification number")]
- public int? EmployeeId { get; set; }
- public static IForm<Vacation> BuildForm()
- {
- //PromptAttribute
- return new FormBuilder<Vacation>()
- .Message("Your Select Vacation Balance Service")
- .Field(nameof(EmployeeId))
- .Confirm("No verification will be shown", state => false)
- .Build();
- }
- }
Next, we need to connect the form to the framework. Open MessagesController and then add the following methods.
- public static IDialog<EmployeeOrder> MakeEmployeeDialog()
- {
- return Chain.From(() => FormDialog.FromForm(EmployeeOrder.BuildForm));
- }
- public static IDialog<Vacation> MakeVacationDialog()
- {
- return Chain.From(() => FormDialog.FromForm(Vacation.BuildForm));
- }
Next, we need to connect to the database by using Entity Framework by creating the data context and entity classes.
First, we need to create EmployeeContext class.
- public EmployeeContext():base("name=dbCs")
- {
- }
- public DbSet<Employee> Employees { get; set; }
Next, create the Employee class.
- public class Employee
- {
- public int Id { get; set; }
- public string Name { get; set; }
- public DateTime JoinDate { get; set; }
- public decimal VacationBalance { get; set; }
- public DateTime UpdateDate { get; set; }
- public decimal Salary { get; set; }
- }
Then, add the connection string in web.config.
- <connectionStrings>
- <add name="dbCs" connectionString="Data Source=.;Initial Catalog=EmployeeDb;User ID={UserId};Password={password};MultipleActiveResultSets=True"
- providerName="System.Data.SqlClient" />
- </connectionStrings>
Next, open RootDialog class and add the following code.
- private async Task MessageReceivedAsync(IDialogContext context, IAwaitable<object> result)
- {
- var activity = await result as Activity;
- var _order = activity.Text.ToLower();
- // defined welcome message
- var _WelcomeMsg2 = context.MakeMessage();
- _WelcomeMsg2.Attachments.Add(new Attachment()
- {
- ContentUrl = "https://cdn.dribbble.com/users/722835/screenshots/4082720/bot_icon_teaser.gif",
- ContentType = "image/gif",
- Name = "HR Bot"
- });
- _WelcomeMsg2.Text = $"Hello. How I can help you?";
- // Return our reply to the user
- await context.PostAsync(_WelcomeMsg2);
- // Go to Employee Dialog
- var _employeeServiceDialog = MessagesController.MakeEmployeeDialog();
- await context.Forward(_employeeServiceDialog, this.ResumeAfterNewOrderDialog, activity, CancellationToken.None);
- }
- private async Task ResumeAfterNewOrderDialog(IDialogContext context, IAwaitable<EmployeeOrder> result)
- {
- // Store the value that NewOrderDialog returned.
- // (At this point, new order dialog has finished and returned some value to use within the root dialog.)
- var resultFromNewOrder = await result;
- switch (resultFromNewOrder.Service.Value)
- {
- case ServiceType.GetVacationBalance:
- // Your select Vacation Balance
- // Go to Vacation Dialog
- var _VacationDialog = MessagesController.MakeVacationDialog();
- await context.Forward(_VacationDialog, ResumeAfterVacationBalanceDialog, null, CancellationToken.None);
- break;
- case ServiceType.LeaveRequest:
- await context.PostAsync($"This Service is Not Yet Available!");
- PromptDialog.Confirm(
- context,
- AfterConfirmAsync,
- "Do you need any other service?",
- "Didn't get that!",
- promptStyle: PromptStyle.Keyboard);
- break;
- }
- }
- private async Task ResumeAfterVacationBalanceDialog(IDialogContext context, IAwaitable<Vacation> result)
- {
- var resultFromVacation = await result;
- // wating till get employee vacation balance from database.
- var _msgWait = context.MakeMessage();
- _msgWait.Type = ActivityTypes.Typing;
- _msgWait.InputHint = InputHints.IgnoringInput;
- await context.PostAsync(_msgWait);
- // create new Data Context object from EmployeeContext Class
- EmployeeContext db = new EmployeeContext();
- var employee = await db.Employees.FindAsync(resultFromVacation.EmployeeId.Value);
- // check if the user exist
- if (employee != null)
- {
- var _msg = context.MakeMessage();
- //To create an Adaptive Card using .NET, install the Microsoft.AdaptiveCards NuGet package.
- AdaptiveCard card = new AdaptiveCard();
- // Add text to the card.
- card.Body.Add(new TextBlock()
- {
- Text = "Your Vacation Balance is:",
- Size = TextSize.Large,
- Weight = TextWeight.Bolder
- });
- // Add text to the card.
- card.Body.Add(new TextBlock()
- {
- Text = $"{employee.VacationBalance.ToString("G2")} Days",
- Weight = TextWeight.Bolder
- });
- // Create the attachment.
- Attachment attachment = new Attachment()
- {
- ContentType = AdaptiveCard.ContentType,
- Content = card
- };
- _msg.Attachments.Add(attachment);
- await context.PostAsync(_msg);
- }
- else
- {
- await context.PostAsync($"There is no employee with this #: [{resultFromVacation.EmployeeId}].");
- }
- PromptDialog.Confirm(
- context,
- AfterConfirmAsync,
- "Do you need any other service?",
- "Didn't get that!",
- promptStyle: PromptStyle.Keyboard);
- }
- private async Task AfterConfirmAsync(IDialogContext context, IAwaitable<bool> result)
- {
- var confirm = await result;
- if (confirm)
- {
- // Go to Employee Dialog
- var _employeeServiceDialog = MessagesController.MakeEmployeeDialog();
- await context.Forward(_employeeServiceDialog, this.ResumeAfterNewOrderDialog, null, CancellationToken.None);
- }
- else
- {
- await context.PostAsync("Thanks. Goodbye.");
- context.EndConversation("");
- }
- }
Now, we need to test our bot, build the solution, open the bot file [filename.bot], and modify the endpoint and then click Save.
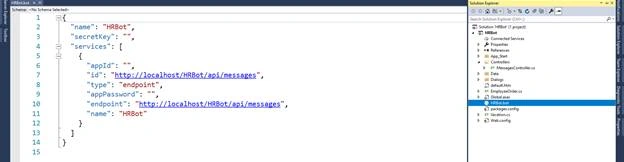
From debug, click start debugging or press F5.
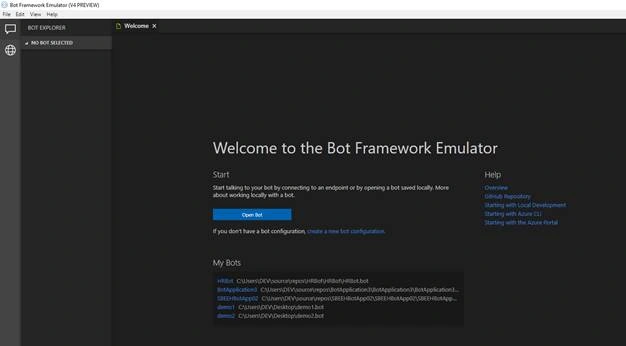
Next, open the Bot emulator. On the welcome screen, click on "Open bot".
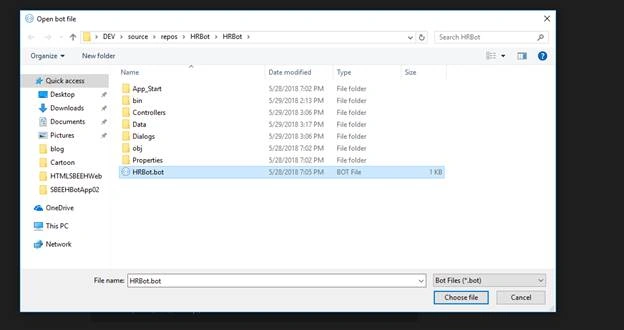
In open dialog, find the bot file [fileName.bot] which will be located in the same project files.
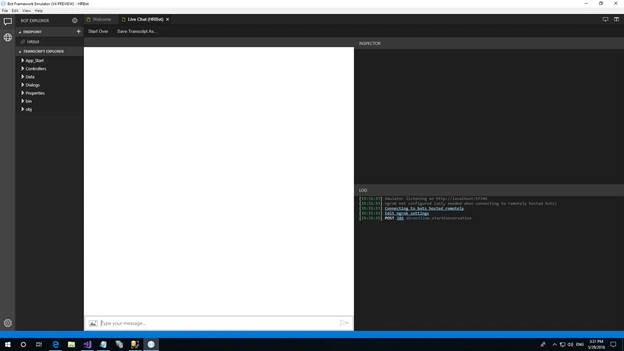
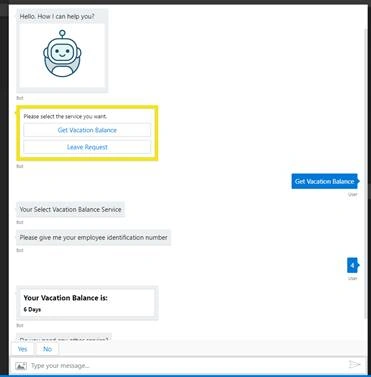
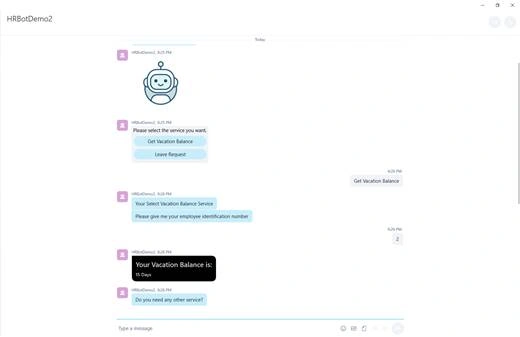
Now, the bot is ready to test. We need to type any message to start the chatting.
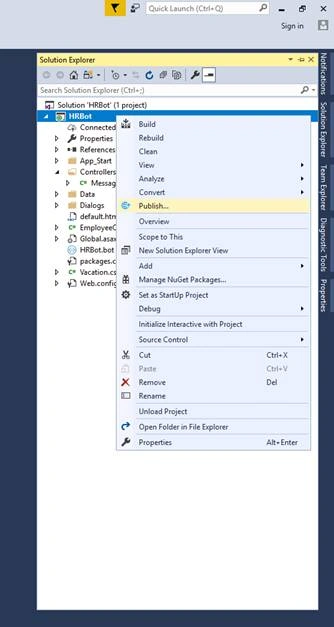
Next, we need to deploy the bot to Azure. Right-click on the project and select "Publish".
Select "Create new" then click "Publish".
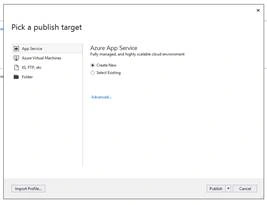
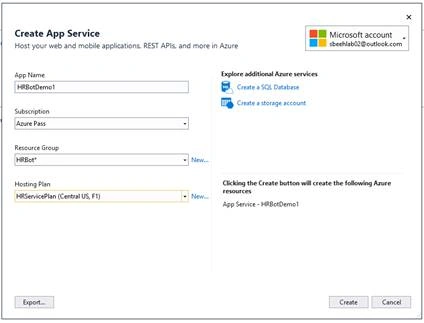
In the "Create App Service" dialog, fill the app name, subscription, resource group, and hosting plan and then click on the "Create" button.
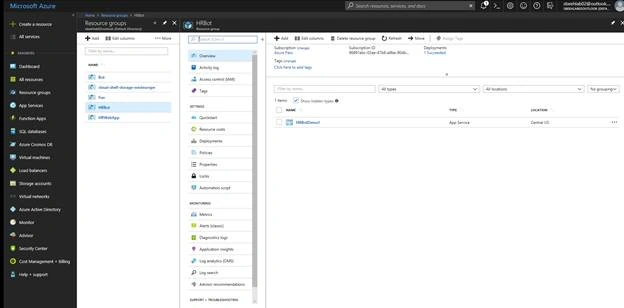
After deploying process is completed, open https://portal.azure.com, open resource groups, HRBot, and verify you find the app service
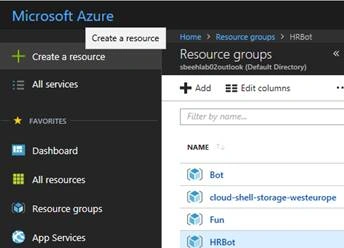
From the left menu create on create a resource.
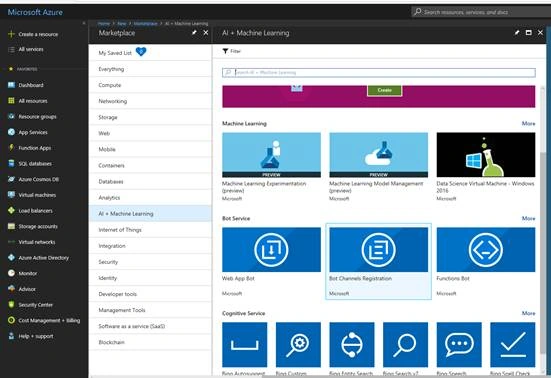
From AI + Machine Learning select Bot Channels Registration then click create.
In Bot Channels Registration dialog fill in all required fields, for messaging endpoint type the app service URL “https://appservise_url/api/messages” then click create.
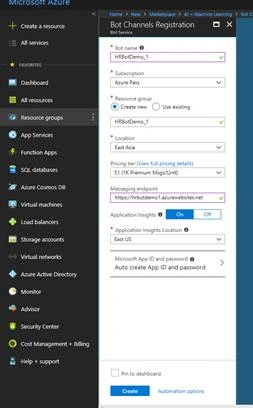
Next, we need to get app id and password, go to Bot Channels Registration and open it, go to settings
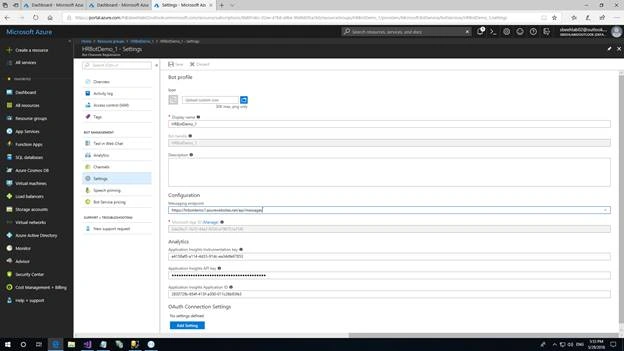
Then click on Microsoft App ID (Manage) link, click on generate new password then copy it.
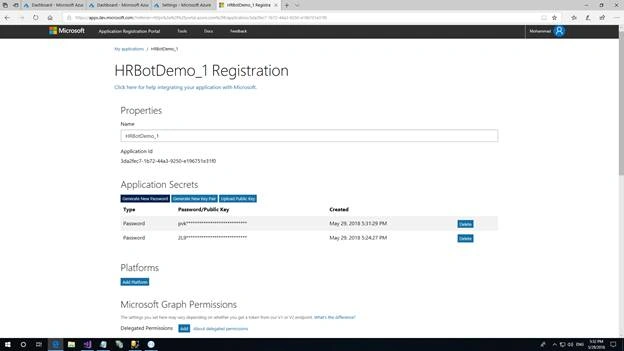
B=Go back to Bot Channels Registration settings and copy app id. Then Click save.
New open bot app service, go to application settings, under Application settings add the following keys,
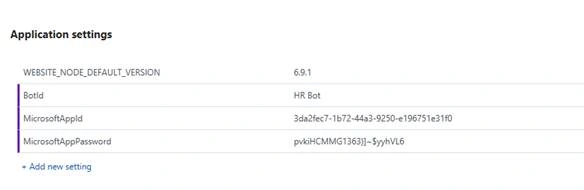
Under Connection strings add the connections string then click save.

Back to Bot Channels Registration, click on Test on Web Chat,
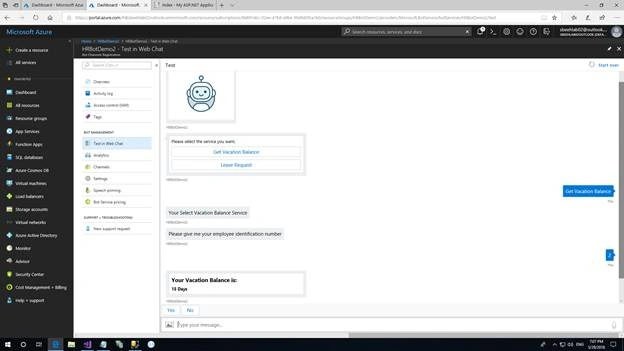
Now we need to add a new channel, click on channels, then click on Skype,
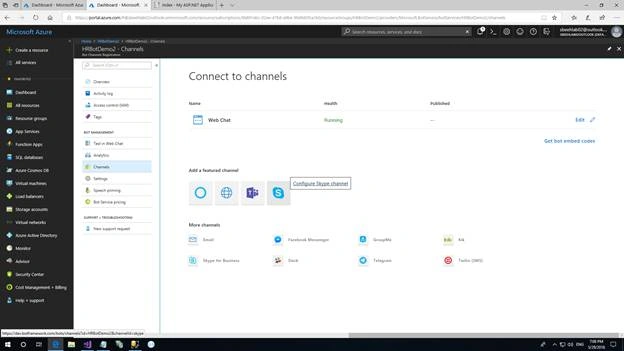
Fill in the required fields and then click save. Now click on the Skype icon,
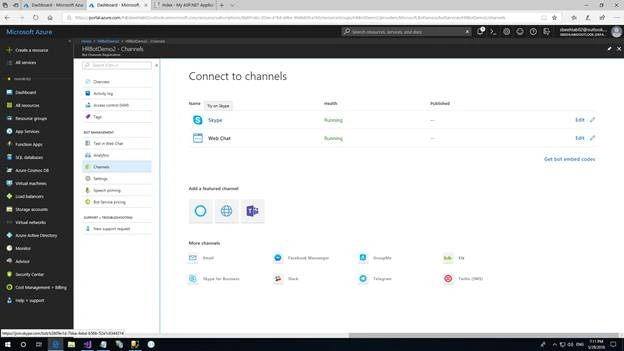
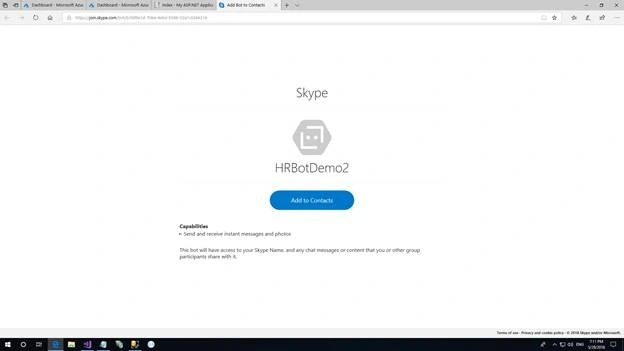
Click add to contacts to open on Skype.
Join the conversation! Your thoughts help the community grow.