

If you are new to Directive then I have already explained about directives in my previous article, Directives in Angular 5, please go through it before you continue reading.
Now, we knew all about built-in directives, it’s a time to control the behavior of DOM elements. So, we create our own directives.
To create custom directives we need to learn only three steps, they are:
- Create a directive
- Register it.
- Use it into View
Step 1 - Create a Directive
Let's understand how to create a new custom directive. We do create a directive which simply highlights an element whenever the mouse hovers over it.
For this, we create a new folder called “directives”. In this folder, we create a file called “element-highlight.directive.ts” file. Inside the file, write the below code,
Let's understand how to create a new custom directive. We do create a directive which simply highlights an element whenever the mouse hovers over it.
For this, we create a new folder called “directives”. In this folder, we create a file called “element-highlight.directive.ts” file. Inside the file, write the below code,
- import { element } from 'protractor';
- import { Directive, OnInit, ElementRef } from "@angular/core";
- @Directive({
- selector:'[elementHighlight]'
- })
- export class ElementHighlightDirective implements OnInit{
- constructor( private eleRef:ElementRef){}
- ngOnInit(){
- this.eleRef.nativeElement.style.backgroundColor='red';
- this.eleRef.nativeElement.style.color='white';
- }
- }
In the above code, @Directive is a decorator function which is imported from ‘@angular/core’ library. Inside the directive, we have used ‘selector’ property just like as we used in component, now set the value of selector with string enclosed in square bracket []. Basically, this value is our directive name, that we will use in our template.
After that we create an object (eleRef) of type ElementRef, to access those elements on which we want to apply this directive (i.e. DOM element). Now, inside the ngOnInit(), we change the style of that element.
Step 2 - Register Directive
Now, it’s time to register and use the directive. As per step 2, we need to register our directive before use. For this, go to “app.module.ts” file. In this file, first of all, import your directive like
- import { ElementHighlightDirective } from './directives/element-highlight.directive';
- declarations: [
- AppComponent,
- ElementHighlightDirective
- ],
Step 3 - Use it in View
Now, as per our third step, we are going to use this directive in our template. So, for this open your "app.component.html" file and put in the below code:
- <div style="text-align:center">
- <h1>
- Custom Directive
- </h1>
- </div>
- <div class="row">
- <p elementHighlight>Mahesh Verma</p>
- </div>
Now, save and run the project and see the output.

After seeing the above output, we can say that our directive is working.
Use of @HostListner in Directives
Now, we have learned about a basic and simple directive. It’s time to handle some DOM events where directives can be implemented. For this, we require something which can handle these DOM events. Angular provides @HostListner decorator function for that.
If we want to handle DOM events like focus, blur, mouseover, mouseleave, mouseenter etc, then we need to listen to them and for listening we use @HostListner. This decorator allows us to subscribe to the raised events from the DOM elements.
Let’s understand it with an example.
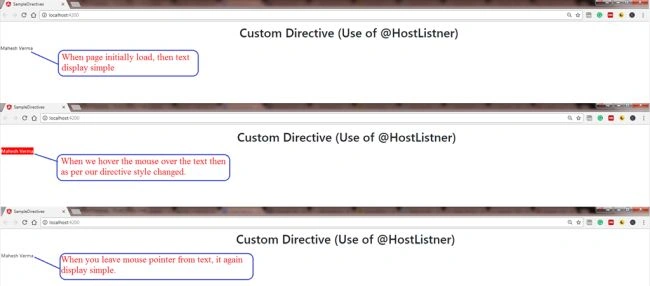
Suppose, in the directive we want that whenever we hover the mouse over the div then its color changes into red, and when the mouse leaves it again it looks simple, then we use two events (mouseenter and mouseleave) with the help of @HostListner.
Suppose, in the directive we want that whenever we hover the mouse over the div then its color changes into red, and when the mouse leaves it again it looks simple, then we use two events (mouseenter and mouseleave) with the help of @HostListner.
Change the code into “element-highlight.directive.ts” file as per the below code,
- export class ElementHighlightDirective implements OnInit{
- constructor( private eleRef:ElementRef){}
- ngOnInit(){
- }
- @HostListener('mouseover') mouseover(eventData:Event){
- this.eleRef.nativeElement.style.backgroundColor="Red";
- this.eleRef.nativeElement.style.color="White";
- }
- @HostListener('mouseleave') mouseleave(eventData:Event){
- this.eleRef.nativeElement.style.backgroundColor="transparent";
- this.eleRef.nativeElement.style.color="Black";
- }
- }
Use of @HostBinding in Directives
Let’s understand about one more decorator function called @HostBinding. Now, if we want to change the style properties, such as height, width, color, border etc., we need to use the @HostBinding() decorator function to access these properties on the host element and assign a value to it in directive class.
In this function, we can pass only one string defining to which property of the hosting element we want to bind or, we can say, decorator, takes one parameter i.e. the name of the host element property whose value we want to assign in the directive.
Let’s understand with the help of an example, we can achieve the above-mentioned feature by making changes in directive property and binding it with HostBinding.
Change the directive code as following,
In this function, we can pass only one string defining to which property of the hosting element we want to bind or, we can say, decorator, takes one parameter i.e. the name of the host element property whose value we want to assign in the directive.
Let’s understand with the help of an example, we can achieve the above-mentioned feature by making changes in directive property and binding it with HostBinding.
Change the directive code as following,
- export class ElementHighlightDirective implements OnInit{
- constructor( private eleRef:ElementRef){}
- ngOnInit(){
- }
- @HostBinding('style.backgroundColor')backgroundColor:string="transparent";
- @HostListener('mouseover') mouseover(eventData:Event){
- this.backgroundColor="Red";
- this.eleRef.nativeElement.style.color="White";
- }
- @HostListener('mouseleave') mouseleave(eventData:Event){
- this.backgroundColor="transparent";
- this.eleRef.nativeElement.style.color="Black";
- }
- }
After getting so much information about directives, now a question arises:
Can we pass data from directives?
So, the answer is Yes, we can pass the data from directives by using the binding property and @Input(). Let’s understand this with the help of an example.
Go to the “element-highlight.directive.ts” and change directive as per the following code,
Can we pass data from directives?
So, the answer is Yes, we can pass the data from directives by using the binding property and @Input(). Let’s understand this with the help of an example.
Go to the “element-highlight.directive.ts” and change directive as per the following code,
- export class ElementHighlightDirective {
- @Input() defaultColor:string="";
- @Input() highlightColor:string="";
- @HostBinding('style.backgroundColor') backgroundColor:string=this.defaultColor;
- constructor( private eleRef:ElementRef){}
- @HostListener('mouseover') mouseover(eventData:Event){
- this.backgroundColor=this.highlightColor;
- this.eleRef.nativeElement.style.color="White";
- }
- @HostListener('mouseleave') mouseleave(eventData:Event){
- this.backgroundColor=this.defaultColor;
- this.eleRef.nativeElement.style.color="Black";
- }
- }
In the above code we declared two input properties called “defaultColor” and “highlightColor” and set the value of these properties on “mouseover” and “mouseleave” events.
Now, pass the value of these properties from directive:
Now, pass the value of these properties from directive:
- <div class="row">
- <p elementHighlight [defaultColor]="'transparent'" [highlightColor]="'Red'">Mahesh Verma</p>
- </div>
Save and run the project, the output is:

Format Credit Card Number using Custom Directive
I hope you have learned all the basic concepts of directive, let’s create one more useful directive, like, a directive which will accept a value from textbox and convert it into credit card format, i.e. with the help of directive put dash (‘-’) after each 4 digits, like someone enter “1234987609876543” then it converted into “1234-9876-0987-6543”.
For this write the following code into your “element-highlight.directive.ts”
For this write the following code into your “element-highlight.directive.ts”
- export class ElementHighlightDirective {
- constructor(private eleRef: ElementRef) { }
- @HostListener('blur') blur(eventData: Event) {
- let val: string = "";
- val = this.eleRef.nativeElement.value;
- if (val.length > 0) {
- val = val.match(new RegExp('.{1,4}', 'g')).join('-');
- }
- this.eleRef.nativeElement.value = val;
- }
- }
- <div class="row">
- <input type="text" placeholder="Enter any number" elementHighlight />
- </div>
See, the output of the above code
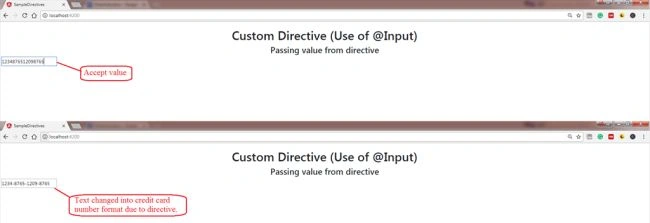
In the above code, we have not applied any kind of validation or other things, we can modify as per our requirements, here we got to know how we can use directives.
Conclusion
As we know, directives are a very important concept in Angular and most of the time we need to create directives as per our requirement. I hope you have learned something about custom directives from this article. For practice purposes, I have attached a sample project called “CustomSampleDirectives” which covers all the code. You can download and modify this as per your requirement. All your queries related to this article and sample project are always welcomed. Thanks for reading.
As we know, directives are a very important concept in Angular and most of the time we need to create directives as per our requirement. I hope you have learned something about custom directives from this article. For practice purposes, I have attached a sample project called “CustomSampleDirectives” which covers all the code. You can download and modify this as per your requirement. All your queries related to this article and sample project are always welcomed. Thanks for reading.
Soujanya BysaniPosted Nov 23, 2018, 1:36 AM
Very useful article....thanks:)
Reena LakraPosted Jun 29, 2018, 3:59 AM
Very informative and nice article. Anyone can easily understand the concept of attribute directive and able to create it.
Komal SharmaPosted Jun 29, 2018, 3:51 AM
Good work, keep post such articles
Bhawna KaushikPosted Jun 22, 2018, 3:29 AM
Very nice explanation sir.....
Shivendra ShuklaPosted Jun 21, 2018, 5:32 AM
Good job ,keep it up
Deepak VermaPosted Jun 21, 2018, 1:38 AM
Great explanation.......... :)
Bhairab DuttPosted Jun 20, 2018, 1:04 PM
Very informative about custom directive in Angular ....