

In my previous article, we discussed how to access a custom control from a LightSwitch screen. In this article, we shall see how to bind the added custom control with the screen property in LightSwitch.
We can take the LightSwitch demo application we have created in part I of this article series. As we discussed in part I, create a demo application.
We have added the custom control; if you want to do something with the control then we need to access the custom control. So access the custom control as we discussed in this article.
So as we are going to bind the control with the screen property [entity property], we need to add a property to the Person entity.
Updating the Entity:
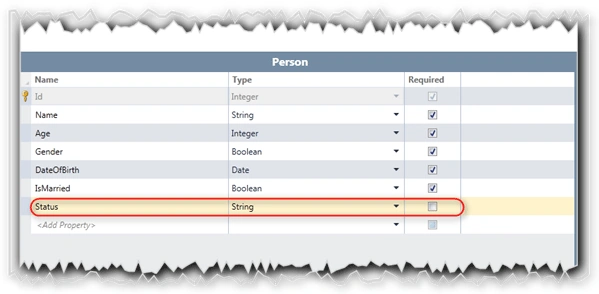
As shown in the above figure, add a new property "Status" to the Person entity.
The status property is used to hold the status message for the Save action.
To display the status message, we need to create a new Label control and need to bind with the Status property of Person entity.
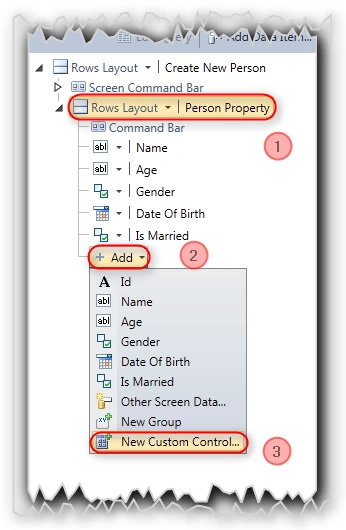
Here:
- Select the "Person Property" screen element.
- To add the new control to the screen, select the "Add" dropdown list.
- Select the "New Custom Control"
Once you click on "New Custom Control" option, you will be getting the "New Custom Control" dialog as shown in the below figure.
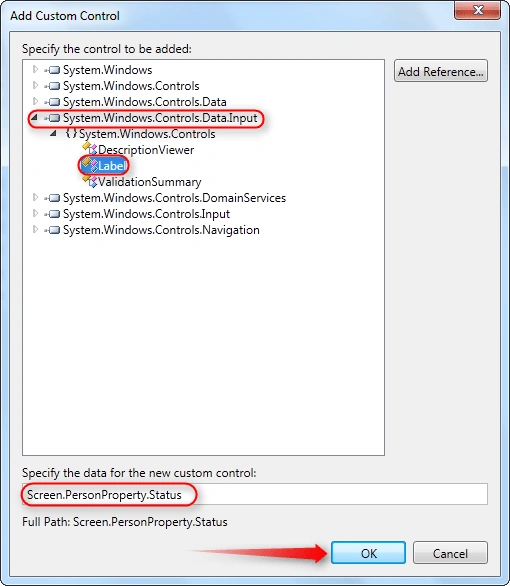
To add the Windows Label control as a custom control to the LightSwitch screen:
- Select the "System. Windows.Controls.Data.Input" namespace.
- Select the Label control under "Controls" namespace of "System. Windows.Controls.Data.Input".
- Select the Property to be bound with the Status custom control as shown in the figure.
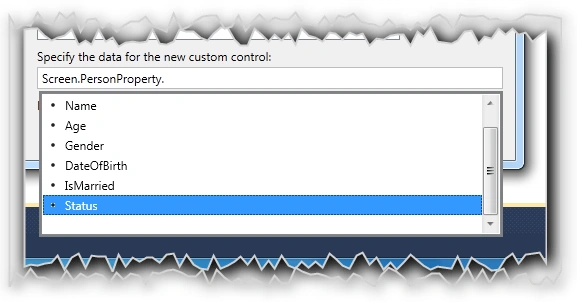
- Click OK to proceed.
The next step is to enable the control to bind with the property defined in the Person entity.
Enabling the Control to bind with Property:
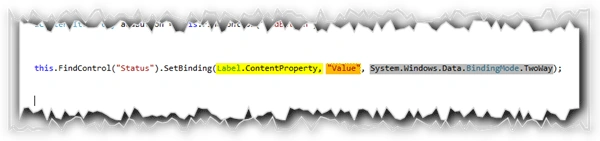
As shown in the above figure:
- The highlighted part with the yellow color specifies which property of the control the status property of the entity should bind to.
- The highlighted part with the orange color specifies the relationship of the entity property with the Control.
- The highlighted part with the gray color specifies the way of binding.
To bind the screen property with the custom control, we need to access the control as a Windows button in code-behind.
To access the control, we need to include the control namespace as shown in the figure.
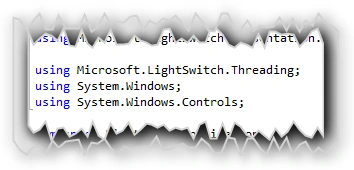
Here we have added the Windows control namespaces and the LightSwitch threading namespace.
The Binding functionality:
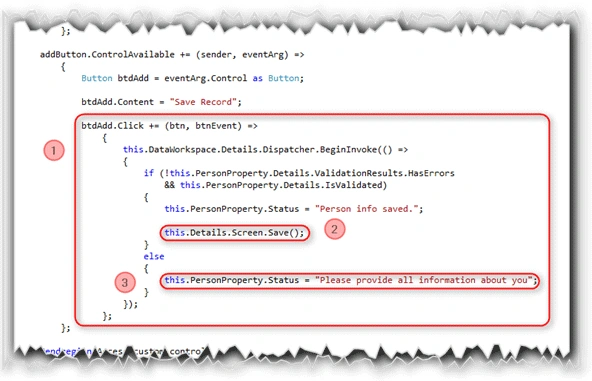
Here,
- Here we have handled the click event of the custom button control.
- We are saving the record on click of the custom control "button" click. For more info about how to save the record while adding it please read this article.
- Here we are assigning the message to the Status property of the Person entity. As we have bound the Status property with the Label control, it will automatically display the message in the Label.
We are done. Hit F5 to see the Application in Action.
Application in Action:
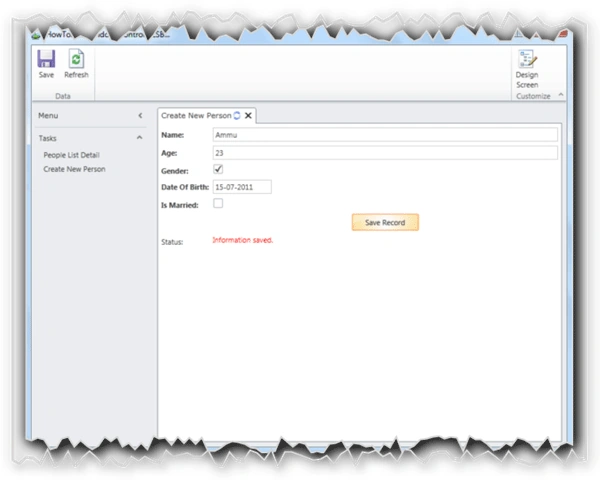
You can see the Label and button as a custom control. As we have bound the status property with the label control the "Information saved" message is displayed.
Summary:
In this article We have seen how to bind the property with custom control of the LightSwitch screen.
Thanks for spending your precious time here. Please provide your valuable feedbacks and comments, which enable me to give a better article the next time.
Thanks.
Asfend YarPosted Feb 21, 2016, 4:50 AM
thanks for share
Asfend YarPosted Feb 21, 2016, 4:50 AM
Hard work shows clearly in your article
Asfend YarPosted Feb 21, 2016, 4:50 AM
great effort
Asfend YarPosted Feb 21, 2016, 4:49 AM
nice
Kiran BoreddyeditedPosted Nov 17, 2011, 6:38 AMEdited Nov 17, 2011, 6:39 AM
Hi Jagan, Thanks for your tutorials. Can you help me with this issue : Can we add/modify/delete new/extra controls(like textbox, autofill etc.) in a screen from another screen(like admin user screen)? Thanks in advance.
CT EwePosted Oct 10, 2011, 9:53 PM
Hi Gamon, there is converters available online. I personally have used http://converter.telerik.com/ which works. Hi Jaganathan, I didn't managed to thank you previously. I actually didn't see the link for the source file. Best regards, CT
Gamon SavatsomboonPosted Oct 10, 2011, 1:08 PM
Hi Jaganathan, Good tutorials, but all in C#. I guess the source codes in VB are not available. Thanks! Gamon
Jaganathan BantheswaranPosted Aug 22, 2011, 3:37 AM
First of all, thanks for your questions. Ans 1: As i have given source code for this article i have mentioned only the functionality of binding i left to mention where you should place the code. So please look into the source code. Ans 2: We specified the data for custom control only, not for the particular property of the custom control. So we are binding the data specified to the particular property called "ContentProperty". Ans 3: Once again, please download the source. Thanks.
CT EwePosted Aug 20, 2011, 7:10 PM
Hi Jaganatan, Thanks for this tutorial. I have a few questions: 1) In the section "Enabling the Control to bind with Property" above, where do you put both pieces of code? 2) Why is this step necessary if they have already asked to specify the data when adding a custom control? 3) How did you make the colour of your text label red? Many thanks. Best regards, CT