

Bitbucket is one of the best-known code repositories. Bitbucket Pipes make building powerful, automated CI/CD pipelines easy.
Highlights
- Bitbucket is absolutely more flexible – with access to a wider range of version control systems
- Gives you unlimited private repositories for free, for up to 5 users (and unlimited public repositories at no extra cost)
- Continuous integration and delivery built-in
- This tool is written in Python and uses the Django web framework
- Supports Git and Mercurial VCS
- Comes with SOC 2 Type II security compliance
- Available for Mac and Windows and Android via an app
- Integrates easily with Jira Software, Confluence, and Bamboo
- Pull requests facilitate code reviews, resulting in higher quality code and an opportunity to share knowledge amongst your team
- Branch permissions provide granular access control for your team, ensuring the right people can make the right changes to your code
- Save time combing through usage results with a semantic search that ranks definitions first
- Supports external authentication with Github, Facebook, Google, and Twitter.
Continuous Integration and Delivery are the foundations of Modern Software Development. the Continuous Integration and Delivery process is going to help your team in the following areas,
- Revision Control
- Build Automation
- Automated Deployment
- Reduced Overhead
- Consistent Build Process
- Confidence and Team Communication
- Risk Mitigation
In this article, I am going to show you how to set up Continuous Integration and Delivery for SharePoint Framework Web Part using Bitbucket.
Prerequisites
- Bitbucket Repository
- SharePoint Framework WebPart Solution associated with the Bitbucket Repository – (Refer – SharePoint Framework HelloWorld example)
- SharePoint App Catalog Site to deploy the SharePoint Framework WebPart
- Add the following environment variables on the Bitbucket repository level
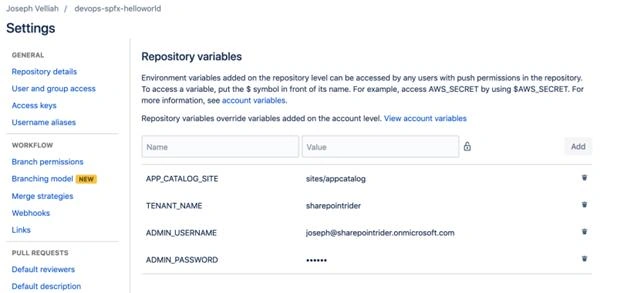
At this point, we are ready to integrate our SharePoint Framework WebPart solution with the Bitbucket Pipelines.
- Open the SharePoint Framework WebPart solution and upload the following custom gulp tasks provided by Elio Struyf. (Note: Install the necessary npm packages given in the instruction)
- upload-app-pkg
- deploy-sppk
- Create a new file for Bitbucket build configuration with name bitbucket-pipelines.yml
- Update the bitbucket-pipelines.yml as shown below
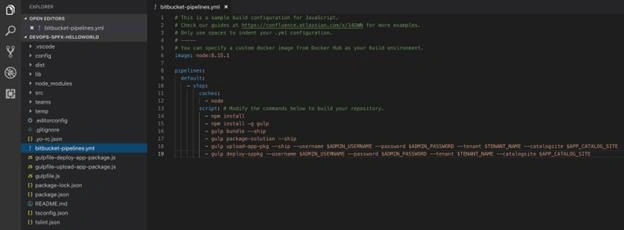
- Commit and push the changes to Bitbucket repository
- Go to the pipelines option and enable the pipeline

- A build should start as soon as we enable the pipeline as shown below
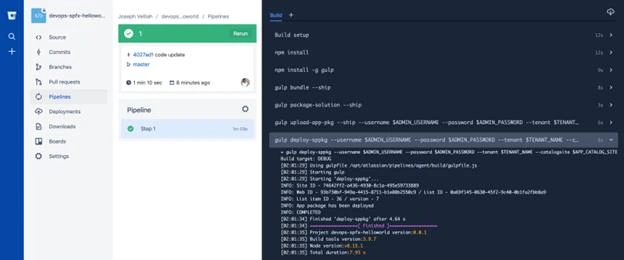
- As you can see in the screenshot, the SharePoint Framework WebPart is packaged and deployed in the app catalog site as per the logic written in the build configuration file.
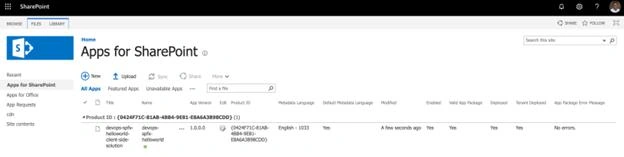
- It is possible to isolate the deployment process in a separate step as explained here.
- Also schedule your pipelines to run a pipeline at hourly, daily or weekly intervals.
Hope you found this interesting.
Sharing is Caring!
Md Tahmidul AbedinPosted Oct 14, 2019, 11:18 AM
Nicely Described article. Thanks for sharing. :)