

The idea of duplexing is very old, when I first read it, it reminded me about my Mom. Well actually not reminded me, but she never allowed me to even forget her, can you imagine 50 missed calls in a day!!! Annoyed . Okay, imagine you being a client and your Mom being the server. It's usually the client that starts communicating with server, requests for data, for authentication or for money, in this case. The server can either respond positively or negatively to the client's request. That is if your request is for money, then you either get it or don't, the later one usually happens in my case. Now what if the server initiates the communication? Yes! It's not always that the server listens to the client's request, but there are situations when the server also broadcasts the messages to all it's clients. This process is called Duplex polling. In Silverlight however, there are many ways to perform this server to client broadcasting, one way is through WCF Services that we are going to use now. So grab a cup of Coffee or two, because the journey is little bit lengthy and a bit complicated.
Before proceeding let's establish the strategy of what exactly we are going to do. What I planned is to keep it neat, clean and simple. So to start, let's create a Silverlight application first, naming it as MyPolling.
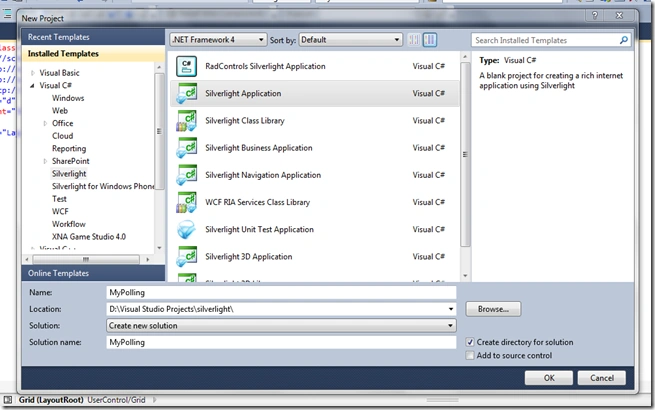
Now before going deep into WCF let's first set up our UI. It's nothing though, but a simple button and a text block. Here's how I arranged them in my XAML:
1: <UserControl x:Class="MyPolling.MainPage" 2: xmlns="http://schemas.microsoft.com/winfx/2006/xaml/presentation" 3: xmlns:x="http://schemas.microsoft.com/winfx/2006/xaml" 4: xmlns:d="http://schemas.microsoft.com/expression/blend/2008" 5: xmlns:mc="http://schemas.openxmlformats.org/markup-compatibility/2006" 6: mc:Ignorable="d" 7: d:DesignHeight="300" d:DesignWidth="400"> 8: 9: <Grid x:Name="LayoutRoot" Background="White"> 10: <Button x:Name="Start" Content="Send Message" 11: VerticalAlignment="Center" 12: HorizontalAlignment="Center" 13: Click="Start_OnClick"/> 14: <TextBlock x:Name="TxtBlkInfo" Text="Press Button to start communication" 15: TextWrapping="Wrap" Width="200" Margin="0,0,200,251" /> 16: </Grid> 17: </UserControl>Looks cool isn't it? Okay, it's time to add some WCF stuff. On the web project "Add" -> "New item" -> "WCF Service" and name it "MyPollingService.svc". After clicking "Add" Visual Studio should have opened the "IMyPollingService" interface for you.
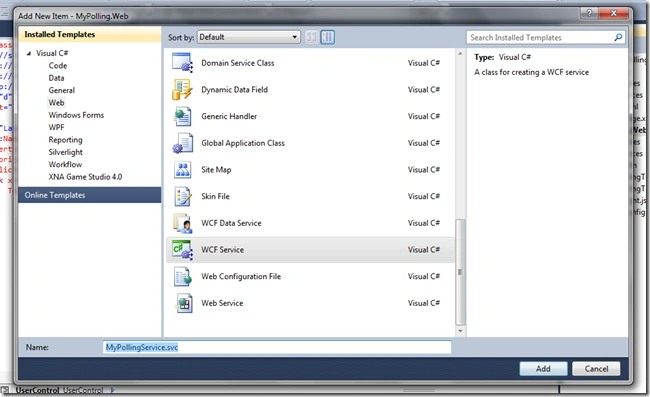
Delete the DoWork() function that is already in the interface. Now replace the interface with exactly the following lines of code:
1: public interface IMyPollingService 2: { 3: [OperationContract(IsOneWay = true)] 4: void SubmitResult(string rS); 5: }It's time to make another interface, the client one, that will actually do the heavy lifting of taking the data from the server to the client. So, below the IMyPollingService interface, add the following lines:
1: [ServiceContract(CallbackContract = typeof(IMyPollingClient))] 2: public interface IMyPollingService 3: { 4: [OperationContract(IsOneWay = true)] 5: void SubmitResult(string rS); 6: }Before wrapping up with the interface part, we need to make the service know about the existence of the client interface. In order to do so, just above the IMyPollingService interface add the following (line #1):
1: [ServiceContract(CallbackContract = typeof(IMyPollingClient))] 2: public interface IMyPollingService 3: { 4: [OperationContract(IsOneWay = true)] 5: void SubmitResult(string rS); 6: }The interface part is ready, what we've done so far is we've structured our service for how our service is to look like, what will it contain etc. In a nutshell, we have created the overall contract of our service. Next is to grab another cup of Coffee.
So far, so good. It's time to open MyPollingService.svc.cs file. As you will see, there would be a class MyPollingService implementing the interface IMyPollingService that we just have modified. Therefore, it might have errors. So click on the implemented interface and implement the non-implemented methods. After that, if you have the SubmitResult method left in the class, then you are with me. Now we are going to send numbers from 1…100 to the client from the server. In order to do that we will use my love of loops, here's the code:
1: public void SubmitResult(string rS) 2: { 3: var client = OperationContext.Current.GetCallbackChannel<IMyPollingClient>(); 4: for (var i = 0; i < 100; i++) 5: { 6: client.ReturnResult(i.ToString(CultureInfo.InvariantCulture)); 7: Thread.Sleep(TimeSpan.FromSeconds(2)); 8: } 9: }Let's pause the coding for a few minutes and edit the configuration file, web.config. First we need to add the DLL System.ServiceModel.PollingDuplex.dll at the web side, to do this just right-click on refrences and browse to the following location: "C:\Program Files\Microsoft SDKs\Silverlight\v3.0\Libraries\Server" and add only the DLL present there. Similarly on the client side add the same DLL but from "C:\Program Files\Microsoft SDKs\Silverlight\v3.0\Libraries\Client". We are then ready for web.config's modifications.
Modifying Web.config is very simple. Let's take small steps to configure the file. The original file that we have presented with is:
1: <?xml version="1.0"?> 2: 3: <!-- 4: For more information on how to configure your ASP.NET application, please visit 5: http://go.microsoft.com/fwlink/?LinkId=169433 6: --> 7: 8: <configuration> 9: <system.web> 10: <compilation debug="true" targetFramework="4.0" /> 11: </system.web> 12: 13: <system.serviceModel> 14: <behaviors> 15: <serviceBehaviors> 16: <behavior name=""> 17: <serviceMetadata httpGetEnabled="true" /> 18: <serviceDebug includeExceptionDetailInFaults="false" /> 19: </behavior> 20: </serviceBehaviors> 21: </behaviors> 22: <serviceHostingEnvironment multipleSiteBindingsEnabled="true" /> 23: </system.serviceModel> 24: </configuration>Step I
Naming behavior of the service
First we need to name the behavior of the service (line #16); let's set it to "BehaviourOfService":
1: <serviceBehaviors> 2: <behavior name="BehaviourOfService"> 3: <serviceMetadata httpGetEnabled="true" /> 4: <serviceDebug includeExceptionDetailInFaults="false" /> 5: </behavior> 6: </serviceBehaviors>Step II
Setting custom binding for pollingduplex
Next we need to create the custom binding for pollingduplex so below the </behaviour> between lines #20 and #21 add the following:
1: <bindings> 2: <customBinding> 3: <binding name="pollingDuplexBinding"> 4: <binaryMessageEncoding /> 5: <pollingDuplex maxPendingSessions="2147483647" 6: maxPendingMessagesPerSession="2147483647" 7: inactivityTimeout="02:00:00" 8: serverPollTimeout="00:05:00"/> 9: <httpTransport /> 10: </binding> 11: </customBinding> 12: </bindings>Step III
Registering the pollingduplex extention
In order to use the polling duplex extension, we need to register it's DLL "System.ServiceModel.PollingDuplex.dll". To do so an extension for the DLL must be added. Here's the XML for the extension that is to be added just inside the <system.serviceModel> tag:
1: <extensions> 2: <bindingElementExtensions> 3: <add name="pollingDuplex" 4: type="System.ServiceModel.Configuration.PollingDuplexElement, 5: System.ServiceModel.PollingDuplex" /> 6: </bindingElementExtensions> 7: </extensions>Now here's how all the XML looks like:
1: <?xml version="1.0"?> 2: 3: <!-- 4: For more information on how to configure your ASP.NET application, please visit 5: http://go.microsoft.com/fwlink/?LinkId=169433 6: --> 7: 8: <configuration> 9: <system.web> 10: <compilation debug="true" targetFramework="4.0" /> 11: </system.web> 12: 13: <system.serviceModel> 14: <extensions> 15: <bindingElementExtensions> 16: <add name="pollingDuplex" 17: type="System.ServiceModel.Configuration.PollingDuplexElement, 18: System.ServiceModel.PollingDuplex" /> 19: </bindingElementExtensions> 20: </extensions> 21: <behaviors> 22: <serviceBehaviors> 23: <behavior name="BehaviourOfService"> 24: <serviceMetadata httpGetEnabled="true" /> 25: <serviceDebug includeExceptionDetailInFaults="false" /> 26: </behavior> 27: </serviceBehaviors> 28: </behaviors> 29: <bindings> 30: <customBinding> 31: <binding name="pollingDuplexBinding"> 32: <binaryMessageEncoding /> 33: <pollingDuplex 34: maxPendingSessions="2147483647" 35: maxPendingMessagesPerSession="2147483647" 36: inactivityTimeout="02:00:00" serverPollTimeout="00:05:00"/> 37: <httpTransport /> 38: </binding> 39: </customBinding> 40: </bindings> 41: <serviceHostingEnvironment multipleSiteBindingsEnabled="true" /> 42: </system.serviceModel> 43: </configuration>Step IV
Endpoint of the Service
The next and final step is to create the end points for the service. Copy the following code to after the </bindings> line #40:
1: <services> 2: <service behaviorConfiguration="BehaviourOfService" name="MyPolling.Web.MyPollingService"> 3: <endpoint address="" binding="customBinding" bindingConfiguration="pollingDuplexBinding" 4: contract="MyPolling.Web.IMyPollingService" /> 5: <endpoint address="mex" binding="mexHttpBinding" contract="IMetadataExchange" /> 6: </service> 7: </services>The two important things that must be looked after is the name of the service and the contract for the endpoint. The name of the service is basically the location of my class MyPollingService, that is inside the MyPolling.Web namespace. And the contract of the endpoint is basically the location of the interface IMyPollingService, that is again inside MyPolling.Web.
Okay, the hard time is over, now I must go and get another cup of Coffee, meanwhile you build your solution.
My solution built with no error. If your solution does compile with errors, it's not my fault. Winking smile
It's time now to consume the service at the client. At the client Silverlight project, right-click on the reference and choose "Add Service Reference". Click on the "Discover" button in the dialog, and you should see "MyPollingService" as shown in the figure below.
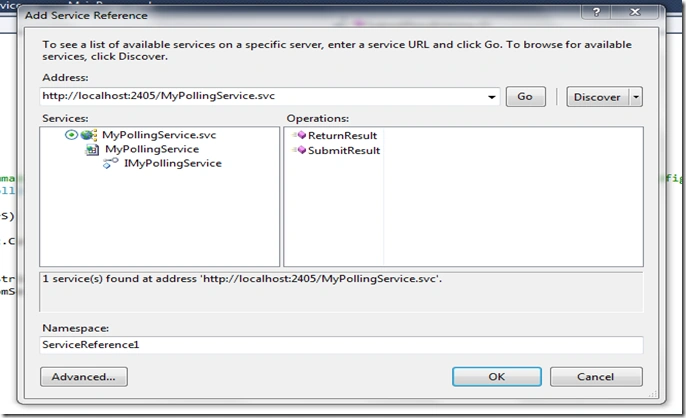
Name the namespace PollingService. In the end, try to remember the click event that we'd made in the mainpage at the beginning. Yes! your right, we need to write some code to consume the response from the server in that event.
- We need to create the endpoint URL for our service.
- Create a PollingDuplexHttpBinding for the service.
- Set the client so as to listen to the server's broadcast.
The following code will do it all, just add it in the button click event:
1: private void Start_OnClick(object sender, RoutedEventArgs e) 2: { 3: EndpointAddress URL = new EndpointAddress("http://localhost:" + 4: HtmlPage.Document.DocumentUri.Port + "/MyPollingService.svc"); 5: PollingDuplexHttpBinding Bind = new PollingDuplexHttpBinding(); 6: _client = new MyPollingServiceClient(Bind, URL); 7: TxtBlkInfo.Text = "Sent..."; 8: _client.SubmitResultAsync("Hello Server"); 9: _client.ReturnResultReceived += 10: new EventHandler<ReturnResultReceivedEventArgs>(_client_ReturnResultReceived); 11: }In the end at line #9 I've created an event handler for the event when the server broadcasts the request. We need to continuously update the value of the Text Block with the results the server sends. So in the handler just add the following line:
1: void _client_ReturnResultReceived(object sender, ReturnResultReceivedEventArgs e) 2: { 3: TxtBlkInfo.Text = e.rS;A long journey has come to an end. Just press "F5", my darling key, and hope your project compiles and runs successfully. Fingers crossed
Mine did. And yes on pressing the "send message" button the text block's value is updating continuously.
This is it! This is how we can implement duplex communication scenarios in Silverlight, to download the sample code go to the following link: http://www.4shared.com/rar/h1Inl9rJ/MyPolling.html?
Don't forget to share your not so valuable comments. As I don't need them Winking smile
Dinesh BeniwalPosted Apr 6, 2013, 11:37 PM
Good Work, Welcome to the C# Corner Neelesh