




What is FormFlow?
FormFlow is an automatic conversion with less effort. It has more options with less effort. It allows you to quickly manage a guided conversation based upon guidelines, which you specify. It is used to gather information from a user with a small amount of code. It can be combined with dialogs to increase its functionality. It is less flexible compared to dialogs.
Features of FormFlow
- Understand both number and textual entries.
- Provides clear guidance and help.
- Asks clarifying question when required.
- Gives feedback on what is understood and what is not understood.
- Message during the process of filling in a form.
- Allows navigating between the steps.
- Custom prompts per field.
- Templates to be used when automatically generating prompts or help.
- Fields that are optional.
- Conditional fields.
- Binds of model.
- Value validation.
- Attributes
- Custom business login blocks
- Form builder class
Attributes
There are many attributes of FormFlow
Describe
Change how a field or a value is shown in the text.
For example: [Describe("My name is {&}")]
Numeric
Provide limits on the values accepted in a number field.
For example: [Numeric(10, 50)]
Optional
Mark a field is as optional, which means that one choice is not to supply a value
For example: [Optional]
Pattern
Define a regular expression to validate a string field.
For example: [Pattern(@"^[\w\s]+$")]
Prompt
Define a prompt to use when asking for a field.
For example: [Prompt("What is your current location?")]
Template
Define a template, which is used to generate the prompts or the value in the prompts.
For example: [Template( TemplateUsage.EnumSelectOne, "Which temperature {&} would you like?{||}", ChoiceStyle = ChoiceStyleOptions.PerLine)]
Terms
Define the input terms, which matches a field or value.
For example,
- Public enum SizeOption {
- [Terms("s", "m", "l")]
- small, medium, large
- };
Custom business logic blocks
- Allows you to inject in before the getter or setter for a property.
- More options.
Form Builder
- Brings it all together.
- Fluent API Interface.
- Can specify attributes and custom logic.
Property of forms and fields
These are the properties to represent the data that Bot will collect from the user.
- Integral (sbyte, byte, short, ushort, int, uint, long, ulong)
- Floating point (float, double)
- String
- DateTime
- Enumeration
- List of enumerations
Note
Any datatype can be nullable.
How to create FormFlow?
We need to specify some information that Bot needs to collect from the user.
Now, take one example to demonstrate how can we create FormFlow? You can easily understand FormFlow, using the example.
For example
Step 1
As FormFlow are bound to a model, we will create a model class first, as shown below.
Add new folder name as Model and add new class. In this example, I have created a class as EnquiryForm.cs
EnquiryForm.cs
- using Microsoft.Bot.Builder.Dialogs;
- using Microsoft.Bot.Builder.FormFlow;
- using System;
- namespace BotFlightEnquiry.Models
- {
- [Serializable]
- public class EnquiryForm
- {
- public FlightTypes flightTypes;
- public ClassTypes classTypes;
- [Optional]
- public IsMeal isMeal;
- public FoodMenu foodMenu;
- public DateTime? DateOfJurney;
- [Numeric(1, 5)]
- public int? NumberOfAdult;
- public int? NumberOfChild;
- public static IForm<EnquiryForm> BuildForm()
- {
- return new FormBuilder<EnquiryForm>()
- .Message("Welcome to the flight reservation BOT.")
- .OnCompletion(async (context, profileForm) =>
- {
- // Tell the user that the form is complete
- await context.PostAsync("Thanks for Enquiry.");
- })
- .Build();
- }
- }
- [Serializable]
- public enum FlightTypes
- {
- International = 1, Domestic = 2
- }
- [Serializable]
- public enum ClassTypes
- {
- FirstClass = 1,
- Business = 2,
- Economy = 3
- }
- [Serializable]
- public enum IsMeal
- {
- Yes = 1,
- No = 2
- }
- [Serializable]
- public enum FoodMenu
- {
- Sandwich = 1,
- Noodles = 2,
- Samosa = 3,
- Cookies = 4,
- Juice = 5,
- Tea = 6,
- Coffee = 7
- }
- }
Now, create a new dialog under dialogs folder. Here, I have created a dialog name as FlightBotDialog.cs.
FlightBotDialog.cs
- using BotFlightEnquiry.Models;
- using Microsoft.Bot.Builder.Dialogs;
- using Microsoft.Bot.Builder.FormFlow;
- using System.Linq;
- using System.Text.RegularExpressions;
- using System.Threading.Tasks;
- namespace BotFlightEnquiry.Dialogs
- {
- public class FlightBotDialog
- {
- public static readonly IDialog<string> dialog = Chain.PostToChain()
- .Select(msg => msg.Text)
- .Switch(
- new RegexCase<IDialog<string>>(new Regex("^hi", RegexOptions.IgnoreCase), (context, text) =>
- {
- return Chain.ContinueWith(new MyDialog(), AfterMyDialogContinue);
- }),
- new DefaultCase<string, IDialog<string>>((context, text) =>
- {
- return Chain.ContinueWith(FormDialog.FromForm(EnquiryForm.BuildForm, FormOptions.PromptInStart), AfterMyDialogContinue);
- }))
- .Unwrap()
- .PostToUser();
- private async static Task<IDialog<string>> AfterMyDialogContinue(IBotContext context, IAwaitable<object> item)
- {
- var token = await item;
- var name = "User";
- context.UserData.TryGetValue<string>("Name", out name);
- return Chain.Return($"Thanks. Please type something-");
- }
- }
- }
Step 3
Add another dialog named MyDialog.cs. Now, you can ask a question, why do we create a new dialog? It is because we can divide the code into small pieces for our convenience.
MyDialog.cs
- using Microsoft.Bot.Builder.Dialogs;
- using Microsoft.Bot.Connector;
- using System;
- using System.Threading.Tasks;
- namespace BotFlightEnquiry.Dialogs
- {
- [Serializable]
- public class MyDialog : IDialog
- {
- public async Task StartAsync(IDialogContext context)
- {
- // My dialog initiates and waits for the next message from the user.
- await context.PostAsync("Hi I am flight Enquiry Bot.");
- await Respond(context);
- // When a message arrives, call MessageReceivedAsync.
- context.Wait(MessageReceivedAsync);
- }
- private static async Task Respond(IDialogContext context)
- {
- var userName = string.Empty;
- context.UserData.TryGetValue<string>("Name", out userName);
- if (string.IsNullOrEmpty(userName))
- {
- await context.PostAsync("What is your Name?");
- context.UserData.SetValue<bool>("GetName", true);
- }
- else
- {
- await context.PostAsync(string.Format("Hi {0}. How can I help you today?", userName));
- }
- }
- public virtual async Task MessageReceivedAsync(IDialogContext context, IAwaitable<IMessageActivity> result)
- {
- var message = await result;// We've got a message!
- var userName = String.Empty;
- var getName = false;
- context.UserData.TryGetValue<string>("Name", out userName);
- context.UserData.TryGetValue<bool>("GetName", out getName);
- if (getName)
- {
- userName = message.Text;
- context.UserData.SetValue<string>("Name", userName);
- context.UserData.SetValue<bool>("GetName", false);
- }
- await Respond(context);
- context.Done(message);
- }
- }
- }
Step 4
When we create Bot, MessageController has been created.
MessagesController.cs
- using BotFlightEnquiry.Dialogs;
- using BotFlightEnquiry.Models;
- using Microsoft.Bot.Builder.Dialogs;
- using Microsoft.Bot.Builder.FormFlow;
- using Microsoft.Bot.Connector;
- using System.Net;
- using System.Net.Http;
- using System.Threading.Tasks;
- using System.Web.Http;
- namespace BotFlightEnquiry
- {
- [BotAuthentication]
- public class MessagesController : ApiController
- {
- /// <summary>
- /// POST: api/Messages
- /// Receive a message from a user and reply to it
- /// </summary>
- public async Task<HttpResponseMessage> Post([FromBody]Activity activity)
- {
- if (activity.Type == ActivityTypes.Message)
- {
- await Conversation.SendAsync(activity, () => FlightBotDialog.dialog);
- }
- else
- {
- HandleSystemMessage(activity);
- }
- var response = Request.CreateResponse(HttpStatusCode.OK);
- return response;
- }
- internal static IDialog<EnquiryForm> MakeRootDialog()
- {
- return Chain.From(() => FormDialog.FromForm(EnquiryForm.BuildForm));
- }
- private Activity HandleSystemMessage(Activity message)
- {
- if (message.Type == ActivityTypes.DeleteUserData)
- {
- // Implement user deletion here
- // If we handle user deletion, return a real message
- }
- else if (message.Type == ActivityTypes.ConversationUpdate)
- {
- // Handle conversation state changes, like members being added and removed
- // Use Activity.MembersAdded and Activity.MembersRemoved and Activity.Action for info
- // Not available in all channels
- }
- else if (message.Type == ActivityTypes.ContactRelationUpdate)
- {
- // Handle add/remove from contact lists
- // Activity.From + Activity.Action represent what happened
- }
- else if (message.Type == ActivityTypes.Typing)
- {
- // Handle knowing tha the user is typing
- }
- else if (message.Type == ActivityTypes.Ping)
- {
- }
- return null;
- }
- }
- }
Work flow
When we debug this Bot, Post method will invoke into MessagesController and proceed, as shown below.
- public async Task<HttpResponseMessage> Post([FromBody]Activity activity)
- {
- if (activity.Type == ActivityTypes.Message)
- {
- await Conversation.SendAsync(activity, () => FlightBotDialog.dialog);
- }
- else
- {
- //HandleSystemMessage(activity);
- }
- var response = Request.CreateResponse(HttpStatusCode.OK);
- return response;
- }
Now, we reached on FlightBotDialog and check if the user has typed hi or any word, which is started by hi, followed by invoking MyDialog, else BuildForm invokes.
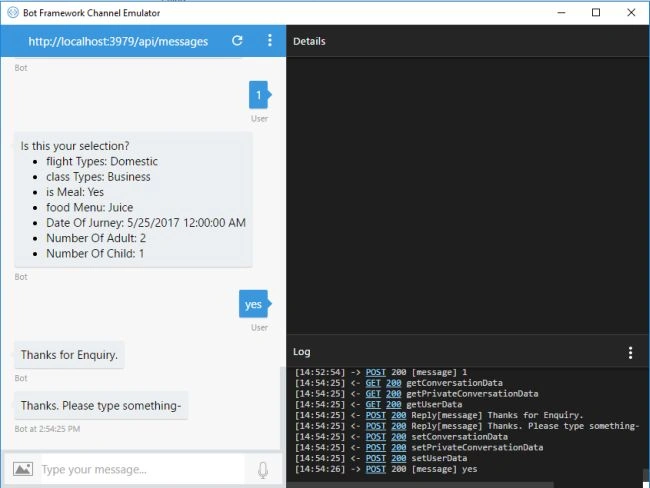
Output
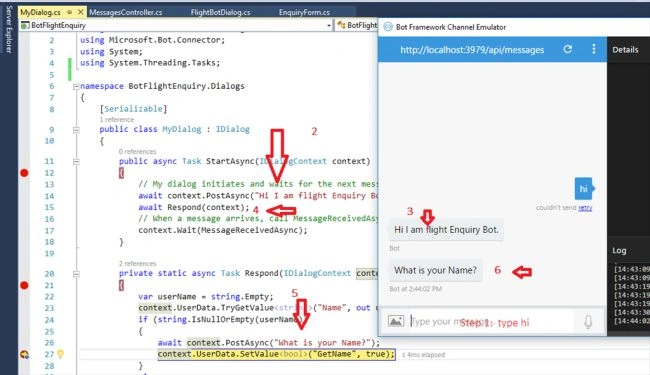
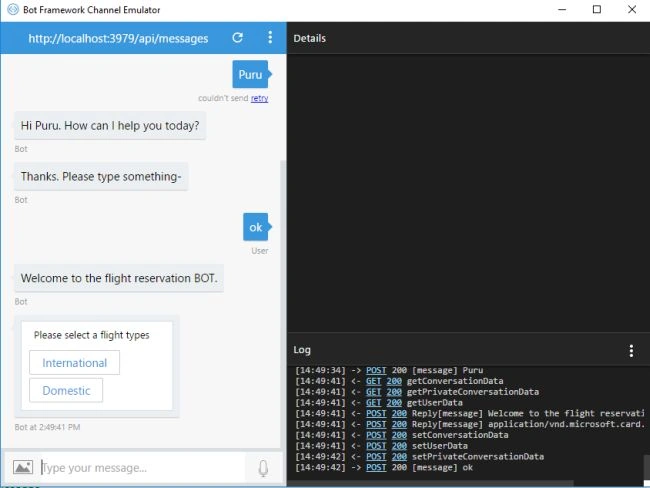
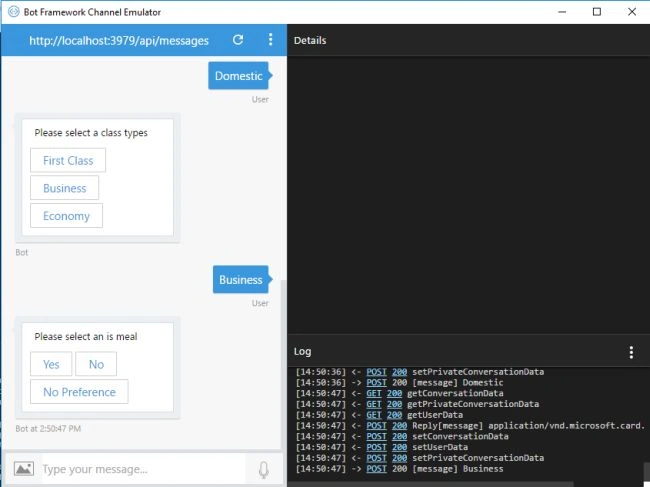
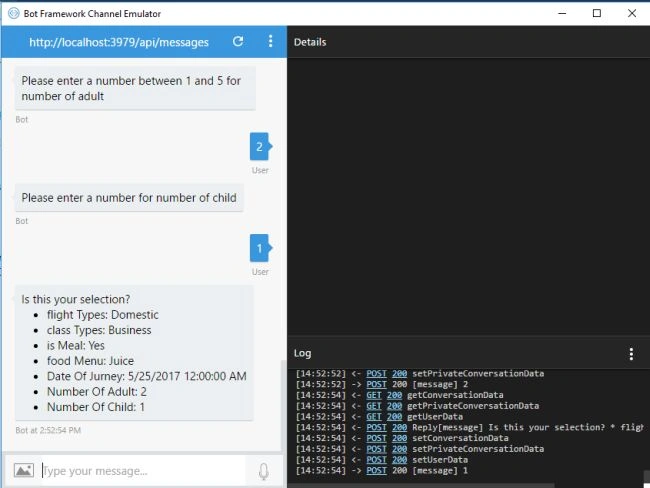
Aakash BhoyarPosted Mar 13, 2019, 5:30 AM
How can we create bot which branching and loops using chaining mechanism in bot V3.
Nicholas AndersenPosted Mar 13, 2018, 12:41 PM
Great post! Is there a way to prepopulate one or more of the fields? For example, what would the code look like to prepopulate the class type to first class? Thanks!
Niladri Sekhar DuttaPosted Jul 27, 2017, 11:04 AM
Hi is there anyway to send the collected information from the user to an actual Rest API that returns flight results in JSON format? I would like to show the user the result after search
Mahesh ChandPosted Jun 13, 2017, 8:15 AM
Nice Puru. Like it.
Mohamed ElqassasPosted May 25, 2017, 1:34 PM
Great, Thanks for sharing!