

Introduction
In this article, I am going to explain Asp.Net Core 7.0 MVC, Asp.net Core’s features and benefits, and why to use Asp.net Core. The Latest version of Asp.Net Core is Asp .Net Core 7.0. It was released on November 8, 2022. We see how to create a simple ASP.NET Core 7.0 Web application and run it.
ASP .NET Core 7.0 version was released on November 08, 2022. Visual Studio 2022 version 17.4.0 is required to develop ASP.Net Core 7.0 web application. It focuses on being unified, modern, simple, and first. Asp.NET Core 7.0 will be supported for only 18 months as standard-term support (STS).
Some Features of Asp.Net Core 7.0
- Dynamic authentication requests in Blazor WebAssembly
- Handle location changing events
- Blazor WebAssembly debugging improvements
- .NET WebAssembly build tools for .NET 6 projects
- .NET JavaScript interop on WebAssembly
- Kestrel full certificate chain improvements
- Faster HTTP/2 uploads
- HTTP/3 improvements
- Experimental Kestrel support for WebTransport over HTTP/3
- Experimental OpenAPI support for gRPC JSON transcoding
- Rate limiting middleware improvements
- macOS dev-certs improvements
What is Asp.Net Core?
ASP.NET Core is a new version of ASP.NET, developed by Microsoft. It is an open-source framework for developing web application and it can be run on windows, Mac, or Linux. ASP.NET Core application can run on both .NET CORE and traditional .NET Framework (.NET framework 4.x). It is completely rewritten from scratch and it was initially launched as Asp.Net 5 but then was renamed to ASP.NET CORE 1.0. Latest version of Asp.Net Core is Asp.Net Core 7.0.
Asp.Net Core is a Cross platform, High-performance, Open-source framework for building modern, Cloud-based, internet-connected applications.
Read my previous articles, using the below links.
- How To Install Visual Studio 2022
- Getting Started With Visual Studio 2022 Community Edition
- Getting Started With .Net 7
Why Use Asp.Net Core?
- Cross platform - It can run on windows, Linux and Mac.
- Better performance - Asp.net core does not depend on system.web.dll for communication between Browser-server. In Asp.net core everything is packages which we need for our application. Packages reduce the request pipeline and improve application performance.
- Dependency Injection - Dependency Injection is in-built in Asp.Net Core.
- Integration with Modern UI Frameworks - It supports modern UI like Angular, ReactJS and Bootstrap, etc.
- Hosting - Asp.Net Core application can be hosted on multiple Web server such as IIS, Apache, Docker, etc. It is not dependent on IIS.
- Open Source - It is fully open-source framework.
- Testability - Unit testing is very easy in Asp.Net core application.
- Side-by-side App Versioning - Asp.Net Core runs on .NET Core, which supports simultaneously running in multiple versions of applications.
- Unified Programming Model for MVC and Web API - In Asp.Net Core both MVC Controller and API Controller Inherit from the same controller base class.
Prerequisites
- Install Visual Studio 2022 updated version 17.4.0
- Install .NET SDK 7.0
Connect To Visual Studio 2022 Community Edition and Create Your First Project
Step 1
First, install Visual Studio 2022 in your system.
Step 2
Go to all programs in your systems, we can see Visual Studio 2022 and Visual Studio Installer.

Step 3
Double-click on Visual Studio 2022 and it will open. It looks like the below screenshot. Opening it the first time will take few minutes.


Creating Your First Project
Click on; create a new Project to create a new project.

You can see various project types there. Choose “Asp.Net Core Web Application” project type for now.
Select Asp.Net Core Web Application, and then click Next.

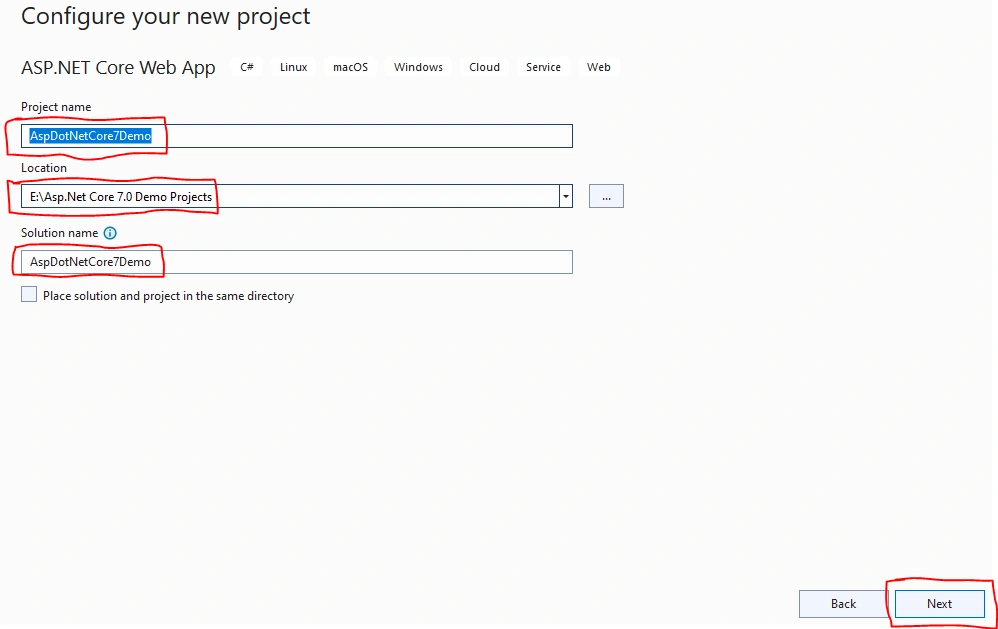
Give a valid name to your project and select a path for it. Then click Next button.
Now, Select framework .NET 7.0(Standard Term Support). You can select the Authentication Type as None, Individual Account, Microsoft Identity platform, or windows. For the demo purpose, I am selecting none. Based on your project need and Authentication requirement you can select this option. You can select Configure for HTTPS based on your need.
If you need Docker in your project then Select Enable Docker.
Uncheck Do not use top-level statements.
Then click the create button.

Asp.Net Core 7.0 Web application created and project structure is shown below,

Program.cs file looks like the below.

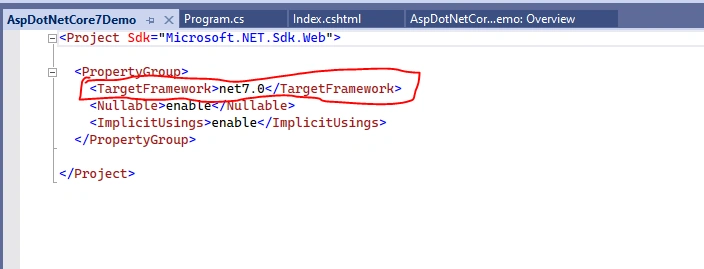
The Project.cspoj file looks like below. Where you can see the target Framework net7.0, by default Nullanle and ImplicitUsings are enabled.
Now, build and Press Ctrl+F5 to run without the debugger. I have made some minor changes to the view pages.
Visual Studio displays the following dialog:

Select Yes if you trust the IIS Express SSL certificate.
Again, The following dialog is displayed:

Select Yes if you agree to trust the development certificate.
Output

Conclusion
In this article, we explained the basics of ASP.NET core 7.0 and what’s new in Asp.NET Core 7.0. We also created a simple “AspDotNetCore7Demo” Asp.Net Core 7.0 web application and run.
Join the conversation! Your thoughts help the community grow.