

Introduction
In this article, we will learn how to use a single Navigation Drawer for different activities. Navigation Drawer is an important widget in the Android application. Mostly, fragments are used in the navigation view to load different screens based on the user selection. But, the usage of Fragments with Navigation may lead to back stack issues sometimes. Instead of using fragments, we can use this approach which is very easy to implement.
Steps
I have split this approach into steps as shown below.
Step 1
Create a new project with Navigation Drawer Activity.
Step 2
Create a BaseActivity extended with AppCompatActivity.
Step 3
Create Activities extended with BaseActivity.
Step 4
Adding the functionalities to perform Navigation menu operations.
Without any more introduction, we will jump into the coding part.
Step 1
- Open Android Studio and create a new project.
- Name the project as per your wish and select the Navigation Drawer activity.
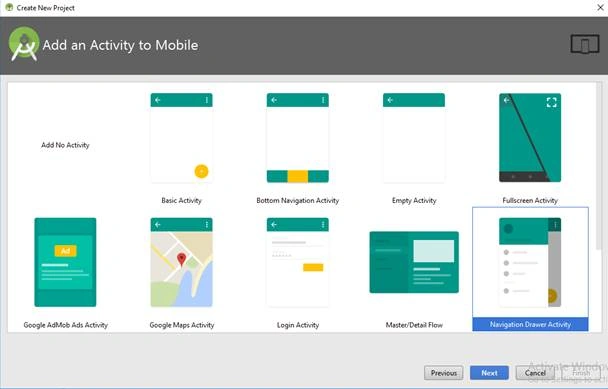
- Click the “Finish” button to create a new project in Android Studio.
Step 2
- In this step, we will rename the Navigation Drawer activity into “BaseActivity”. For example, I have renamed the “MainActivity” to “BaseActivity”.
- Change the default coding part of your BaseActivity as shown below.
- The parent of this Activity is AppCompatActivity. So, this BaseActivity can be used as Parent Activity for others to access the properties of AppCompatActivity.
- This Activity is implemented with OnNavigationItemSelectedListener. So, here you can handle the navigation of activities.
Coding Part
Create content_main.xml file and add FrameLayout as Parent Layout as shown below. This Frame Layout is used to bind the layout of children layouts.
- <?xml version="1.0" encoding="utf-8"?>
- <FrameLayout xmlns:android="http://schemas.android.com/apk/res/android"
- xmlns:tools="http://schemas.android.com/tools"
- android:id="@+id/content_frame"
- android:layout_width="match_parent"
- android:layout_height="match_parent"
- tools:context="com.androidmads.navdraweractivity.BaseActivity"
- tools:showIn="@layout/app_bar_main" />
Here, the FrameLayout has the id as "content_frame" is used to hold the activity's view.
Open your BaseActivity.java file and add the following code. Here, activity_main.xml is a container view for content_main.xml.
- Drawer Layout is used to implement the Sidemenu in Android.
- Here, class and SecondActivity.class are used as children activities of BaseActivity.
- public class BaseActivity extends AppCompatActivity
- implements NavigationView.OnNavigationItemSelectedListener {
- // Declaration
- DrawerLayout drawer;
- FloatingActionButton fab;
- NavigationView navigationView;
- @Override
- protected void onCreate(Bundle savedInstanceState) {
- super.onCreate(savedInstanceState);
- setContentView(R.layout.activity_main);
- // Initialize Widgets
- Toolbar toolbar = (Toolbar) findViewById(R.id.toolbar);
- setSupportActionBar(toolbar);
- fab = (FloatingActionButton) findViewById(R.id.fab);
- drawer = (DrawerLayout) findViewById(R.id.drawer_layout);
- ActionBarDrawerToggle toggle = new ActionBarDrawerToggle(this, drawer, toolbar, R.string.navigation_drawer_open, R.string.navigation_drawer_close);
- drawer.setDrawerListener(toggle);
- toggle.syncState();
- navigationView = (NavigationView) findViewById(R.id.nav_view);
- navigationView.setNavigationItemSelectedListener(this);
- }
- @SuppressWarnings("StatementWithEmptyBody")
- @Override
- public boolean onNavigationItemSelected(@NonNull MenuItem item) {
- int id = item.getItemId();
- if (id == R.id.nav_activity1) {
- startAnimatedActivity(new Intent(getApplicationContext(), FirstActivity.class));
- } else if (id == R.id.nav_activity2) {
- startAnimatedActivity(new Intent(getApplicationContext(), SecondActivity.class));
- }
- drawer = (DrawerLayout) findViewById(R.id.drawer_layout);
- drawer.closeDrawer(GravityCompat.START);
- return true;
- }
Here, startAnimatedActivity(intent) used to start activity with animation.
Step 2
- Create a New Activity and name it as java and change the parent of this class from AppCompatActivity to BaseActivity as we created.
- Again, create a New Activity named as java and change the parent of this class from AppCompatActivity to BaseActivity as we created.
Step 3
- Replace setContentView in the onCreate method of the class files created in step2 as shown below.
Coding Part
- setContentView(R.layout.activity_first)
- To
- LayoutInflater inflater = (LayoutInflater) this.getSystemService(Context.LAYOUT_INFLATER_SERVICE);
- //inflate your activity layout here!
- @SuppressLint("InflateParams")
- View contentView = inflater.inflate(R.layout.activity_first, null, false);
- drawer.addView(contentView, 0);
Here, activity_first.xml is the designer layout of the activity FirstActivity.java
This approach is used to inflate or bind the layouts in BaseActivity
Full code for FirstActivity.java
- public class FirstActivity extends BaseActivity {
- @Override
- protected void onCreate(Bundle savedInstanceState) {
- super.onCreate(savedInstanceState);
- LayoutInflater inflater = (LayoutInflater) this.getSystemService(Context.LAYOUT_INFLATER_SERVICE);
- //inflate your activity layout here!
- @SuppressLint("InflateParams")
- View contentView = inflater.inflate(R.layout.activity_first, null, false);
- drawer.addView(contentView, 0);
- navigationView.setCheckedItem(R.id.nav_activity1);
- fab.setOnClickListener(new View.OnClickListener() {
- @Override
- public void onClick(View view) {
- Snackbar.make(view, "Hello First Activity", Snackbar.LENGTH_LONG)
- .setAction("Action", null).show();
- }
- });
- }
- @Override
- public boolean onCreateOptionsMenu(Menu menu) {
- // Inflate the menu; this adds items to the action bar if it is present.
- getMenuInflater().inflate(R.menu.menu_first, menu);
- return true;
- }
- @Override
- public boolean onOptionsItemSelected(MenuItem item) {
- // Handle action bar item clicks here. The action bar will
- // automatically handle clicks on the Home/Up button, so long
- // as you specify a parent activity in AndroidManifest.xml.
- int id = item.getItemId();
- //noinspection SimplifiableIfStatement
- if (id == R.id.action_menu_first) {
- return true;
- }
- return super.onOptionsItemSelected(item);
- }
- @Override
- public void onBackPressed() {
- drawer = (DrawerLayout) findViewById(R.id.drawer_layout);
- if (drawer.isDrawerOpen(GravityCompat.START)) {
- drawer.closeDrawer(GravityCompat.START);
- } else {
- if (Build.VERSION.SDK_INT >= Build.VERSION_CODES.JELLY_BEAN) {
- finishAffinity();
- } else {
- super.onBackPressed();
- }
- }
- }
- }
Here, I have overridden the onBackPressed method to close DrawerLayout and close the application.
In this way, you can use the same NavigationView for all the activities. We can create other activities with the same approach to show NavigationView.
Note
Don’t forget to change your launcher activity into FirstActivity.
Download Code
You can download the full source code for this article from GitHub.
Shiv KPosted Jun 19, 2019, 2:07 AM
Hi bro, thank you for the article. It has helped me. However there is one issue I am facing. When we go from one activity to another using navigation drawer it takes some seconds to happen. The transition doesn't happen instantly. Can you explain why this happens and how it can be rectified?
dheerendra dwivediPosted May 31, 2019, 4:31 AM
How to implement this ,on another activities or all activities.
Senor MikePosted Aug 24, 2018, 10:07 PM
Every tutorial you guys post is FULL OF ERRORS. Proof read your work before posting. Also, consider giving your readers access to working src code.
Sagar Pandurang KapPosted Dec 27, 2017, 11:53 PM
Good article. Where is the final output??