




We will save the name and path of the image to the database.
Initial chamber
Step 1: Open Visual Studio 2010 and create an empty website. Give it a suitable name: FileUpload_demo.
Step 2: In Solution Explorer you will get your empty website. Add a web form and SQL Database like the following:
For Web Form:
FileUpload_demo (Your Empty Website) - Right Click, Add New Item, then click Web Form. Name it Fileupload_demo.aspx.
Go back to your website in Solution Explorer and Add New Folder and Give name as - New Folder, then Upload.
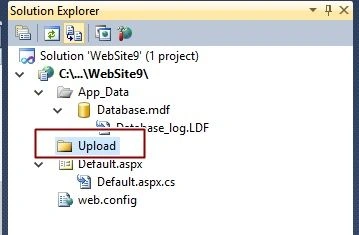
For SQL Server Database:
FileUpload_demo (Your Empty Website) - Right Click and Add New Item, then click SQL Server Database. Add Database inside the App_Data_folder.
Database chamber
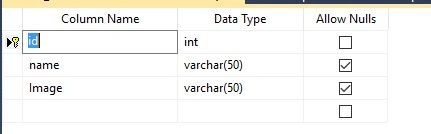
Step 3: Go to your Database [Database.mdf], we will create a table - tbl_Data. Also, go to the database.mdf - Table and add new table, design your table like this:
Table - tbl_data ([Don’t forget to make ID, then Identity Specification as Yes).
Design chamber
Step 4: Open Fileupload_demo.aspx file to create our design, we will drag an HTML table, a FileUpload control, button, label and a textbox.
Fileupload_demo.aspx
- <%@ Page Language="C#" AutoEventWireup="true" CodeFile="Default.aspx.cs" Inherits="_Default" %>
- <!DOCTYPE html PUBLIC "-//W3C//DTD XHTML 1.0 Transitional//EN" "http://www.w3.org/TR/xhtml1/DTD/xhtml1-transitional.dtd">
- <html xmlns="http://www.w3.org/1999/xhtml">
- <head runat="server">
- <title></title>
- <style type="text/css">
- .style1
- {
- width: 283px;
- }
- .style2
- {
- width: 247px;
- }
- </style>
- </head>
- <body>
- <form id="form1" runat="server">
- <div>
- <table style="width:100%;">
- <tr>
- <td class="style1">
- Image Name:</td>
- <td class="style2">
- <asp:TextBox ID="TextBox1" runat="server"></asp:TextBox>
- </td>
- <td>
- </td>
- </tr>
- <tr>
- <td class="style1">
- Upload Your Image:</td>
- <td class="style2">
- <asp:FileUpload ID="FileUpload1" runat="server" />
- </td>
- <td>
- <asp:Label ID="Label1" runat="server"></asp:Label>
- </td>
- </tr>
- <tr>
- <td class="style1">
- </td>
- <td class="style2">
- <asp:Button ID="Button1" runat="server" onclick="Button1_Click" Text="Upload" />
- </td>
- <td>
- </td>
- </tr>
- </table>
- </div>
- </form>
- </body>
- </html>

Code chamber
Step 5: Open Fileupload_demo.aspx.cs file to write code for saving the image to database.
Fileupload_demo.aspx.cs
- using System;
- using System.Collections.Generic;
- using System.Linq;
- using System.Web;
- using System.Web.UI;
- using System.Web.UI.WebControls;
- using System.IO;
- using System.Data;
- using System.Data.SqlClient;
- public partial class _Default : System.Web.UI.Page
- {
- protected void Page_Load(object sender, EventArgs e)
- {
- }
- protected void Button1_Click(object sender, EventArgs e)
- {
- if (FileUpload1.HasFile)
- {
- string str = FileUpload1.FileName;
- FileUpload1.PostedFile.SaveAs(Server.MapPath("~/Upload/" + str));
- string Image = "~/Upload/" + str.ToString();
- string name = TextBox1.Text;
- SqlConnection con = new SqlConnection(@"Data Source=.\SQLEXPRESS;AttachDbFilename=|DataDirectory|\Database.mdf;Integrated Security=True;User Instance=True");
- SqlCommand cmd = new SqlCommand("insert into tbl_data values(@name,@Image)", con);
- cmd.Parameters.AddWithValue("@name", name);
- cmd.Parameters.AddWithValue("Image", Image);
- con.Open();
- cmd.ExecuteNonQuery();
- con.Close();
- Label1.Text = "Image Uploaded";
- Label1.ForeColor = System.Drawing.Color.ForestGreen;
- }
- else
- {
- Label1.Text = "Please Upload your Image";
- Label1.ForeColor = System.Drawing.Color.Red;
- }
- }
- }


Hope you liked it. Have a good day. Thank you for reading.
Gangadhar JagtapPosted Nov 8, 2020, 9:14 PM
Getting below error after click on upload button Could not find a part of the path 'C:\Users\hp\Desktop\WebApp\WebApp\Upload\IMG-20200727-WA0003[2].jpg'
Rahul PatilPosted Dec 6, 2019, 7:53 AM
@Nilesh Jadav Image uploading successfully but how to display image??
GUNJAN PARMARPosted Mar 25, 2019, 3:05 AM
Getting this error while inserting image System.Data.SqlClient.SqlException: 'Operand type clash: nvarchar is incompatible with image'
Farahin RijalPosted Dec 7, 2017, 6:44 AM
Why i got error "Could not find a part of the path 'C:\WebSite9\Upload\1.png'" { string str = FileUpload1.FileName;FileUpload1.PostedFile.SaveAs(Server.MapPath("~/Upload/" + str)); string Image = "~/Upload/" + str.ToString(); string name = TextBox1.Text; please help me fix it. i got same problem as my previous project too.
Steve BonifacePosted Jun 13, 2017, 11:57 PM
Thank you for sharing. I wish I could get it to work, but I'm seeing an error: A network-related or instance-specific error occurred while establishing a connection to SQL Server. The server was not found or was not accessible. Verify that the instance name is correct and that SQL Server is configured to allow remote connections. (provider: SQL Network Interfaces, error: 26 - Error Locating Server/Instance Specified)I've set everything up according to the instructions above. Not certain why this error is being encountered. Is there a critical piece you're presupposing that I may not have known about? Thank you
Rashid khanPosted Jan 15, 2017, 9:37 AM
Sir plzzz upload the code for how to show the uploaded image in gridview
Arul RPosted Oct 28, 2015, 5:29 AM
Good one !!!
Santhakumar MunuswamyPosted Oct 18, 2015, 3:08 AM
Good one
Sibeesh VenuPosted Oct 15, 2015, 4:13 AM
Thanks for sharing
Mukesh KumarPosted Oct 15, 2015, 2:28 AM
Great Job Sir
Ankit BansalPosted Oct 15, 2015, 12:48 AM
nice..thanks for sharing
Harshad PansuriyaPosted Oct 15, 2015, 12:02 AM
Nice one
Rajeesh MenothPosted Oct 14, 2015, 12:36 PM
Nice One..!!!
Ravi PatelPosted Oct 14, 2015, 12:36 PM
nice work sir
Muhammad Aqib ShehzadPosted Oct 14, 2015, 12:20 PM
nice dear
RakeshPosted Oct 14, 2015, 11:49 AM
Good one