

Introduction to SkiaSharp
- SkiaSharp is a cross-platform 2D graphics API for .NET platforms.
- SkiaSharp Views & Layers is a set of platform-specific Views and Containers that can be used to draw on the screen and it's used in Google Chrome, Mozilla Firefox, and Android devices.
- Binding for Windows.Forms, WPF, iOS, tvOS, Mac, Android, Xamarin.Android and Xamarin.Forms and it can be used across mobile, server, and desktop models to render the images.
- Skia Graphics Engine was acquired by Google in 2005 and it's an open source package.
More details: github.com/mono/skiasharp
NuGet Package : Xamarin.Android -->search "SkiaSharp"
Xamarin.Forms -->search"SkiaSharp.Views.Forms"
Properties of SkiaSharp
NuGet Package : Xamarin.Android -->search "SkiaSharp"
Xamarin.Forms -->search"SkiaSharp.Views.Forms"
Properties of SkiaSharp
- SKcanvas.
- SKGLView.
- SKPaint.
- SKPath.
- SKShader.
- SKPathEffect .
Now, let us discuss the attributes of SkiaSharp properties.
Drawing on SKcanvas
The SKcanvas is used for drawing models, lines, arcs, text, and images.
Drawing Methods of SKcanvas
Drawing on SKcanvas
The SKcanvas is used for drawing models, lines, arcs, text, and images.
Drawing Methods of SKcanvas
- DrawCircle.
- DrawRect.
- DrawLine.
- DrawText.
- DrawBitmap.
- DrawPath.
Transforms for SKcanvas
- Translate.
- Scale.
- RotateDegrees.
- RotateRadians.
Drawing attributes for SKPaint
- Style: Storke, Fill, or both.
- Color: SKColor value.
- StrokeWidth.
- StrokeCap: Butt, Square, or Round.
- Strokejoin: Miter, Bevel, or Round.
- Shader: gradients or bitmap tilling.
SKPath --> Connected lines and curves
- MoveTo and LineTo.
- ArcTo: Three kinds of arc definitions.
- CubicTo and QuadTo: Bezier.
- SVG path date in and out.
SKShader --> Fancy filles
- CreateLinearGradient.
- CreateRadialGradient.
- CreateSweepGradient.
- CreateTwoPointConicalGradient.
- CreatePerlinNoise.
- CreateBitmap: Tile with SKBitmap.
SKPathEffects -->fancy strokes
- CreateDash.
- Create1DPathof: Dashed with another path.
- Create2DPath: Storked with an array of another path.
- CreateDiscrete: Jitter effect.
The below article contains just a few but many different things can be done by catclock with SkiaSharp.
Let's start.
Step 1
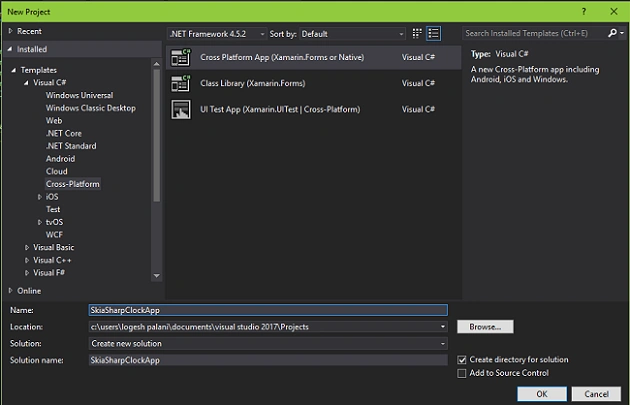
You can get started with a new Xamarin.Forms app by going to File >>New >>Visual C#>>Cross-platform >>select Cross-platform App(Xamarin.Native or Xamarin.Forms) and give the application a suitable name, such as CatClock. Choose your project location, then click OK.
Step 2
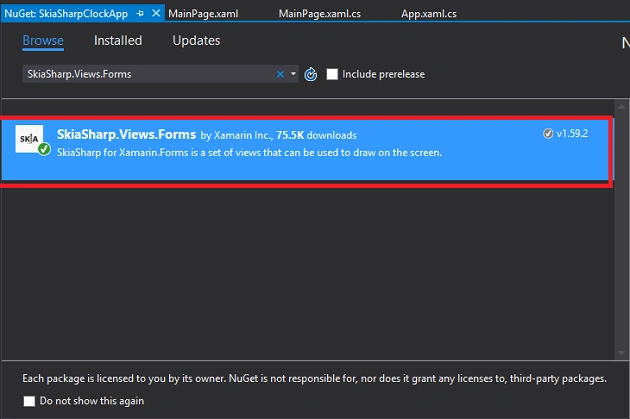
In this step, add the following NuGet Packages for your project.
You can get started with a new Xamarin.Forms app by going to File >>New >>Visual C#>>Cross-platform >>select Cross-platform App(Xamarin.Native or Xamarin.Forms) and give the application a suitable name, such as CatClock. Choose your project location, then click OK.
Step 2
In this step, add the following NuGet Packages for your project.
- SkiaSharp
- SkiaSharp.Views
- SkiaSharp.Views.Forms
For that, go to Solution Explorer and select your solution, right click and select "Manage NuGet Packages for the solution".
Now, select the following NuGet package and install it.
- SkiaSharp.Views.Forms
Step 3
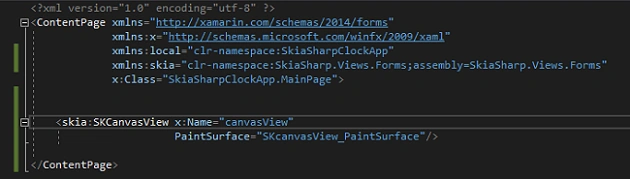
In this step, add a SkiaSharp control to your projects. For that, go to Solution Explorer >>catclock(PCL)>> double click on MainPage.xaml.
After opening this, you can add SkiaSharp assembly and XAML code to your project. Write the code given below.
Assembly
In this step, add a SkiaSharp control to your projects. For that, go to Solution Explorer >>catclock(PCL)>> double click on MainPage.xaml.
After opening this, you can add SkiaSharp assembly and XAML code to your project. Write the code given below.
Assembly
- xmlns:skia="clr-namespace:SkiaSharp.Views.Forms;assembly=SkiaSharp.Views.Forms"
XAML Code
- <?xml version="1.0" encoding="utf-8" ?>
- <ContentPage xmlns="http://xamarin.com/schemas/2014/forms"
- xmlns:x="http://schemas.microsoft.com/winfx/2009/xaml"
- xmlns:skia="clr-namespace:SkiaSharp.Views.Forms;assembly=SkiaSharp.Views.Forms"
- xmlns:local="clr-namespace:CatClock"
- x:Class="CatClock.MainPage">
- <ContentPage.Padding>
- <OnPlatform x:TypeArguments="Thickness"
- iOS="0, 20, 0, 0" />
- </ContentPage.Padding>
- <skia:SKCanvasView x:Name="canvasView"
- PaintSurface="canvasView_PaintSurface" />
- </ContentPage>
Step 4
Now, we need to add a picture for background display. For that, go to Solution Explorer >> Add >> Existing item >> select one picture and click OK.
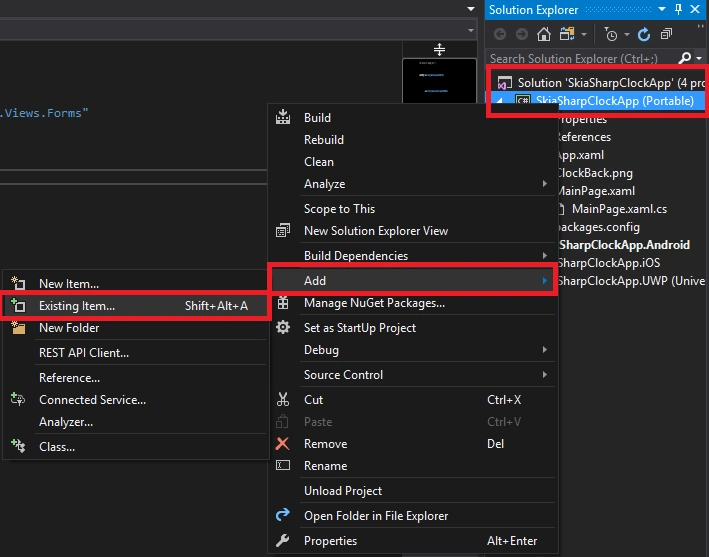
Now, we need to add a picture for background display. For that, go to Solution Explorer >> Add >> Existing item >> select one picture and click OK.
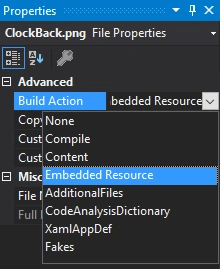
After this, let's change the picture properties to embedded resource. For that, go to Properties window >> Advanced >> Build Action>>select Embedded Resource.
Step 5
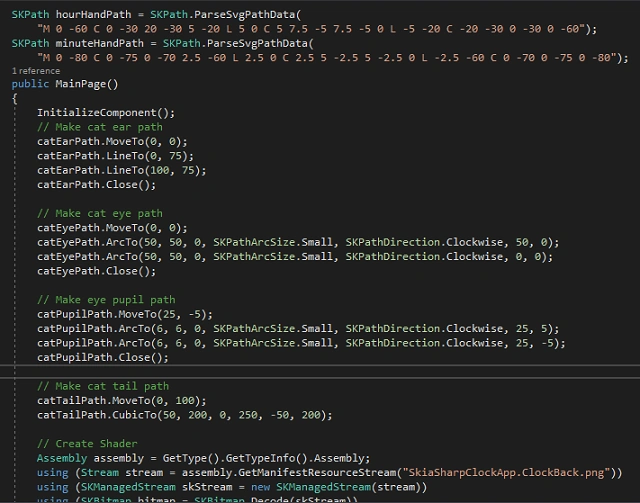
In this step, open Solution Explorer>>catclock(PCL)>>Mainpage.xaml.cs page and double-click to open the design view. Here is the code for this page.
In this step, open Solution Explorer>>catclock(PCL)>>Mainpage.xaml.cs page and double-click to open the design view. Here is the code for this page.
CS code
- using System;
- using System.IO;
- using System.Reflection;
- using Xamarin.Forms;
- using SkiaSharp;
- using SkiaSharp.Views.Forms;
- namespace CatClock
- {
- public partial class MainPage : ContentPage
- {
- SKPaint blackFillPaint = new SKPaint
- {
- Style = SKPaintStyle.Fill,
- Color = SKColors.Black
- };
- SKPaint whiteStrokePaint = new SKPaint
- {
- Style = SKPaintStyle.Stroke,
- Color = SKColors.White,
- StrokeWidth = 2,
- StrokeCap = SKStrokeCap.Round,
- IsAntialias = true
- };
- SKPaint whiteFillPaint = new SKPaint
- {
- Style = SKPaintStyle.Fill,
- Color = SKColors.White
- };
- SKPaint greenFillPaint = new SKPaint
- {
- Style = SKPaintStyle.Fill,
- Color = SKColors.PaleGreen
- };
- SKPaint blackStrokePaint = new SKPaint
- {
- Style = SKPaintStyle.Stroke,
- Color = SKColors.Black,
- StrokeWidth = 20,
- StrokeCap = SKStrokeCap.Round
- };
- SKPaint grayFillPaint = new SKPaint
- {
- Style = SKPaintStyle.Fill,
- Color = SKColors.Gray
- };
- SKPaint backgroundFillPaint = new SKPaint
- {
- Style = SKPaintStyle.Fill
- };
- SKPath catEarPath = new SKPath();
- SKPath catEyePath = new SKPath();
- SKPath catPupilPath = new SKPath();
- SKPath catTailPath = new SKPath();
- SKPath hourHandPath = SKPath.ParseSvgPathData(
- "M 0 -60 C 0 -30 20 -30 5 -20 L 5 0 C 5 7.5 -5 7.5 -5 0 L -5 -20 C -20 -30 0 -30 0 -60");
- SKPath minuteHandPath = SKPath.ParseSvgPathData(
- "M 0 -80 C 0 -75 0 -70 2.5 -60 L 2.5 0 C 2.5 5 -2.5 5 -2.5 0 L -2.5 -60 C 0 -70 0 -75 0 -80");
- public MainPage()
- {
- InitializeComponent();
- // Make cat ear path
- catEarPath.MoveTo(0, 0);
- catEarPath.LineTo(0, 75);
- catEarPath.LineTo(100, 75);
- catEarPath.Close();
- // Make cat eye path
- catEyePath.MoveTo(0, 0);
- catEyePath.ArcTo(50, 50, 0, SKPathArcSize.Small, SKPathDirection.Clockwise, 50, 0);
- catEyePath.ArcTo(50, 50, 0, SKPathArcSize.Small, SKPathDirection.Clockwise, 0, 0);
- catEyePath.Close();
- // Make eye pupil path
- catPupilPath.MoveTo(25, -5);
- catPupilPath.ArcTo(6, 6, 0, SKPathArcSize.Small, SKPathDirection.Clockwise, 25, 5);
- catPupilPath.ArcTo(6, 6, 0, SKPathArcSize.Small, SKPathDirection.Clockwise, 25, -5);
- catPupilPath.Close();
- // Make cat tail path
- catTailPath.MoveTo(0, 100);
- catTailPath.CubicTo(50, 200, 0, 250, -50, 200);
- // Create Shader
- Assembly assembly = GetType().GetTypeInfo().Assembly;
- using (Stream stream = assembly.GetManifestResourceStream("CatClock.WoodGrain.png"))
- using (SKManagedStream skStream = new SKManagedStream(stream))
- using (SKBitmap bitmap = SKBitmap.Decode(skStream))
- using (SKShader shader = SKShader.CreateBitmap(bitmap, SKShaderTileMode.Mirror, SKShaderTileMode.Mirror))
- {
- backgroundFillPaint.Shader = shader;
- }
- Device.StartTimer(TimeSpan.FromSeconds(1f / 60), () =>
- {
- canvasView.InvalidateSurface();
- return true;
- });
- }
- private void canvasView_PaintSurface(object sender, SKPaintSurfaceEventArgs e)
- {
- SKSurface surface = e.Surface;
- SKCanvas canvas = surface.Canvas;
- canvas.DrawPaint(backgroundFillPaint);
- int width = e.Info.Width;
- int height = e.Info.Height;
- // Set transforms
- canvas.Translate(width / 2, height / 2);
- canvas.Scale(Math.Min(width / 210f, height / 520f));
- // Get DateTime
- DateTime dateTime = DateTime.Now;
- // Head
- canvas.DrawCircle(0, -160, 75, blackFillPaint);
- // Draw ears and eyes
- for (int i = 0; i < 2; i++)
- {
- canvas.Save();
- canvas.Scale(2 * i - 1, 1);
- canvas.Save();
- canvas.Translate(-65, -255);
- canvas.DrawPath(catEarPath, blackFillPaint);
- canvas.Restore();
- canvas.Save();
- canvas.Translate(10, -170);
- canvas.DrawPath(catEyePath, greenFillPaint);
- canvas.DrawPath(catPupilPath, blackFillPaint);
- canvas.Restore();
- // Draw whiskers
- canvas.DrawLine(10, -120, 100, -100, whiteStrokePaint);
- canvas.DrawLine(10, -125, 100, -120, whiteStrokePaint);
- canvas.DrawLine(10, -130, 100, -140, whiteStrokePaint);
- canvas.DrawLine(10, -135, 100, -160, whiteStrokePaint);
- canvas.Restore();
- }
- // Move Tail
- float t = (float)Math.Sin((dateTime.Second % 2 + dateTime.Millisecond / 1000.0) * Math.PI);
- catTailPath.Reset();
- catTailPath.MoveTo(0, 100);
- SKPoint point1 = new SKPoint(-50 * t, 200);
- SKPoint point2 = new SKPoint(0, 250 - Math.Abs(50 * t));
- SKPoint point3 = new SKPoint(50 * t, 250 - Math.Abs(75 * t));
- catTailPath.CubicTo(point1, point2, point3);
- canvas.DrawPath(catTailPath, blackStrokePaint);
- // Clock background
- canvas.DrawCircle(0, 0, 100, blackFillPaint);
- // Hour and minute marks
- for (int angle = 0; angle < 360; angle += 6)
- {
- canvas.DrawCircle(0, -90, angle % 30 == 0 ? 4 : 2, whiteFillPaint);
- canvas.RotateDegrees(6);
- }
- // Hour hand
- canvas.Save();
- canvas.RotateDegrees(30 * dateTime.Hour + dateTime.Minute / 2f);
- canvas.DrawPath(hourHandPath, grayFillPaint);
- canvas.DrawPath(hourHandPath, whiteStrokePaint);
- canvas.Restore();
- // Minute hand
- canvas.Save();
- canvas.RotateDegrees(6 * dateTime.Minute + dateTime.Second / 10f);
- canvas.DrawPath(minuteHandPath, grayFillPaint);
- canvas.DrawPath(minuteHandPath, whiteStrokePaint);
- canvas.Restore();
- // Second hand
- canvas.Save();
- float seconds = dateTime.Second + dateTime.Millisecond / 1000f;
- canvas.RotateDegrees(6 * seconds);
- whiteStrokePaint.StrokeWidth = 2;
- canvas.DrawLine(0, 10, 0, -80, whiteStrokePaint);
- canvas.Restore();
- }
- }
- }
Step 6
Now, go to "Build" menu and click "Configure Manager". Here, you can configure your startup projects. Click F5 or Start to build and run your application.
After a few seconds, the app will start running on your Android simulators and you will see your app working successfully.

Finally, we have successfully created a Xamarin.Forms catclock with SkiaSharp application.
Conclusion
I hope you have learned how to design cat clock application using Visual Studio.
I hope you have learned how to design cat clock application using Visual Studio.
meir rotfPosted Jun 8, 2020, 1:55 AM
Nice litte demo. I am trying to do the same inside a native xamarin.android mono .. I can't get it to draw anything. in the timer function It won't accept the InvalidateSurface.. Do you have the same kind of demo for simple android app?
Anbu ManiPosted Nov 19, 2017, 2:02 AM
Very Nice one..Keep it up
Satyaprakash SamantarayPosted Nov 18, 2017, 12:21 PM
Nice one.............