

Step 1
Now, create a new ASP.NET Web Application.
Step 2
Write the code, given below, on default.aspx page.
- <%@ Page Language="C#" AutoEventWireup="true" CodeBehind="UploadMultipleFileDemo.aspx.cs"
- Inherits="MultipleFile.UploadMultipleFileDemo" %> < !DOCTYPE html PUBLIC "-//W3C//DTD XHTML 1.0 Transitional//EN"
- "http://www.w3.org/TR/xhtml1/DTD/xhtml1-transitional.dtd" >
- < html xmlns = "http://www.w3.org/1999/xhtml" >
- < head runat = "server" >
- < title > < /title> < /head> < body >
- < form id = "form1"
- runat = "server" >
- < div >
- < asp: ScriptManager ID = "SM"
- runat = "server" >
- < /asp:ScriptManager>
- < asp: UpdatePanel ID = "UpdFileUpload"
- runat = "server" >
- < ContentTemplate >
- < asp: FileUpload ID = "FuImage"
- multiple = "multiple"
- runat = "server" / >
- < asp: Button ID = "btnSaveFile"
- Text = "Save"
- runat = "server"
- onclick = "btnSaveFile_Click" / >
- < /ContentTemplate> < Triggers >
- < asp: PostBackTrigger ControlID = "btnSaveFile" / > -
- < /Triggers> < /asp:UpdatePanel> < /div> < /form> < /body> < /html>
Step-3
- using System;
- using System.Web;
- using System.IO;
Step-4
Now, add the line of the code, given below, on default.aspx.cs page-
- namespace MultipleFile {
- public partial class UploadMultipleFileDemo: System.Web.UI.Page {
- protected void Page_Load(object sender, EventArgs e) {
- }
- protected void btnSaveFile_Click(object sender, EventArgs e) {
- HttpFileCollection _HttpFileCollection = Request.Files;
- for (int i = 0; i < _HttpFileCollection.Count; i++) {
- HttpPostedFile _HttpPostedFile = _HttpFileCollection[i];
- if (_HttpPostedFile.ContentLength > 0)
- _HttpPostedFile.SaveAs(Server.MapPath("~/a4d/ComposeEmail/" + Path.GetFileName(_HttpPostedFile.FileName)));
- }
- }
- }
- }
Step-5
Now, run your Application and you will get the output, given below-
Step-6
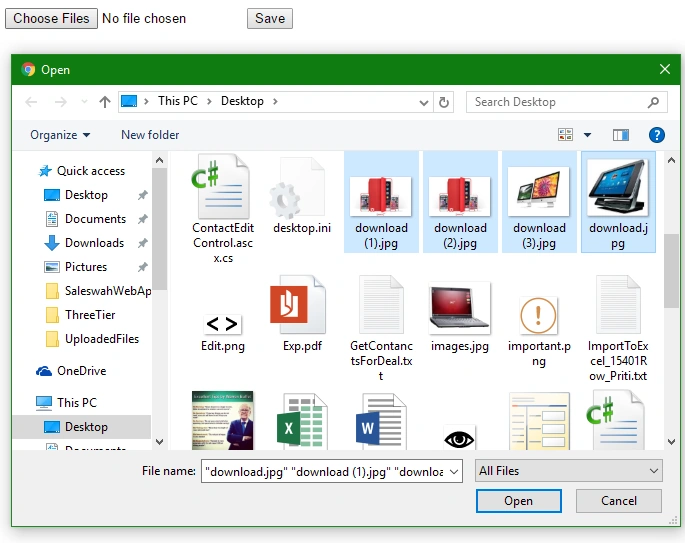
Now, click browse and select one or more than one image.
Step-7
Now, click save button after selecting all the image file.
Step-8
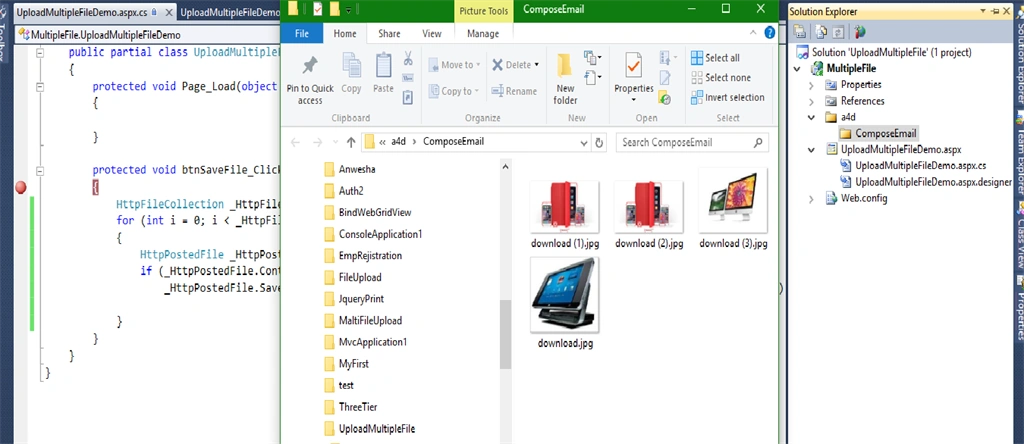
Now, you can see in our client folder, where all the selected images are saved.
Join the conversation! Your thoughts help the community grow.