

- Typeface custom_font = Typeface.createFromAsset(getAssets(), "fonts/font name.ttf");
- tv.setTypeface(custom_font);
With the help of data binding, you will be able to set custom font with just one line and that too without creating any object of TextView/EditText. Doesn't it sound interesting? Let’s follow the step by step instructions to implement it.
Step 1 - Implement data binding in your Android Studio project.
Refer to my previous tutorial to setup DataBinding “Working with DataBinding Android“.
Step 2 - Create custom class (CustomFontFamily) for storing and accessing custom fonts.
- public class CustomFontFamily {
- static CustomFontFamily customFontFamily;
- HashMap <String, String> fontMap = new HashMap<>();
- public static CustomFontFamily getInstance() {
- if (customFontFamily == null)
- customFontFamily = new CustomFontFamily();
- return customFontFamily;
- }
- public void addFont(String alias, String fontName) {
- fontMap.put(alias, fontName);
- }
- public Typeface getFont(String alias) {
- String fontFilename = fontMap.get(alias);
- if (fontFilename == null) {
- Log.e("", "Font not available with name " + alias);
- return null;
- } else {
- Typeface typeface = Typeface.createFromAsset(CustomApplication.getContext().getAssets(), "fonts/" + fontFilename);
- return typeface;
- }
- }
- }
Step 3 - Define custom fonts in Application class.
- public class CustomApplication extends Application {
- private static Context context;
- CustomFontFamily customFontFamily;
- @Override
- public void onCreate() {
- super.onCreate();
- CustomApplication.context = this;
- customFontFamily = CustomFontFamily.getInstance();
- // add your custom fonts here with your own custom name.
- customFontFamily.addFont("amatic", "AmaticSC-Regular.ttf");
- customFontFamily.addFont("pacific", "Pacifico.ttf");
- customFontFamily.addFont("seasrn", "SEASRN.ttf");
- customFontFamily.addFont("capture", "Capture_it.ttf");
- customFontFamily.addFont("xcelsion", "Xcelsion_Italic.ttf");
- }
- public static Context getContext() {
- return context;
- }
- }
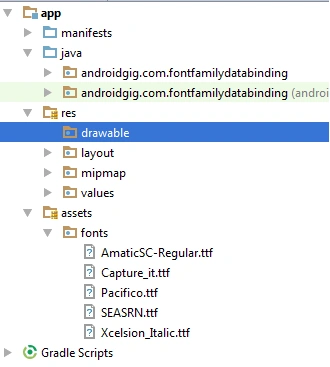
Step 4 - Write FontBinding class to use fonts throughout the application.
- public class FontBinding {
- @BindingAdapter({"bind:font"})
- public static void setFont(TextView textView, String fontName) {
- textView.setTypeface(CustomFontFamily.getInstance().getFont(fontName));
- }
- }
Step 5 - Access fonts from XML.
- <?xml version="1.0" encoding="utf-8"?>
- <layout xmlns:android="http://schemas.android.com/apk/res/android"
- xmlns:app="http://schemas.android.com/apk/res-auto">
- <LinearLayout android:layout_width="match_parent"
- android:layout_height="match_parent"
- android:gravity="center"
- android:orientation="vertical">
- <TextView android:layout_width="wrap_content"
- android:layout_height="wrap_content"
- android:text="Welcome to AndroidGig"
- android:textAllCaps="true"
- android:textAppearance="?android:attr/textAppearanceLarge"
- app:font="@{`amatic`}" />
- <TextView android:layout_width="wrap_content"
- android:layout_height="wrap_content"
- android:layout_marginTop="10dp"
- android:text="Welcome to AndroidGig"
- android:textAllCaps="true"
- android:textAppearance="?android:attr/textAppearanceLarge"
- app:font="@{`pacific`}" />
- <TextView android:layout_width="wrap_content"
- android:layout_height="wrap_content"
- android:layout_marginTop="10dp"
- android:text="Welcome to AndroidGig"
- android:textAllCaps="true"
- android:textAppearance="?android:attr/textAppearanceLarge"
- app:font="@{`seasrn`}" />
- <TextView android:layout_width="wrap_content"
- android:layout_height="wrap_content"
- android:layout_marginTop="10dp"
- android:text="Welcome to AndroidGig"
- android:textAllCaps="true"
- android:textAppearance="?android:attr/textAppearanceLarge"
- app:font="@{`capture`}" />
- <TextView android:layout_width="wrap_content"
- android:layout_height="wrap_content"
- android:layout_marginTop="10dp"
- android:text="Welcome to AndroidGig"
- android:textAllCaps="true"
- android:textAppearance="?android:attr/textAppearanceMedium"
- app:font="@{`xcelsion`}" />
- </LinearLayout>
- </layout>
Step 6 - The final step is to bind your activity with a View.
- @Override
- protected void onCreate(Bundle savedInstanceState) {
- super.onCreate(savedInstanceState);
- DataBindingUtil.setContentView(this, R.layout.activity_main);
- }

The code, given above, will work perfectly but it will create an object of TypeFace each time we set the font. What we will do next is to store that TypeFace in cache; so next time, it will take TapeFace from cache instead of creating a new object. There will be a minor change you need to do in your CustomFontFamily.java.
- public class CustomFontFamily {
- static CustomFontFamily customFontFamily;
- HashMap <String, String> fontMap = new HashMap<>();
- HashMap <String, Typeface> fontCache = new HashMap<>();
- public static CustomFontFamily getInstance() {
- if (customFontFamily == null)
- customFontFamily = new CustomFontFamily();
- return customFontFamily;
- }
- public void addFont(String alias, String fontName) {
- fontMap.put(alias, fontName);
- }
- public Typeface getFont(String alias) {
- String fontFilename = fontMap.get(alias);
- if (fontFilename == null) {
- Log.e("", "Font not available with name " + alias);
- return null;
- }
- if (fontCache.containsKey(alias))
- return fontCache.get(alias);
- else {
- Typeface typeface = Typeface.createFromAsset(CustomApplication.getContext().getAssets(), "fonts/" + fontFilename);
- fontCache.put(fontFilename, typeface);
- return typeface;
- }
- }
- }
Join the conversation! Your thoughts help the community grow.